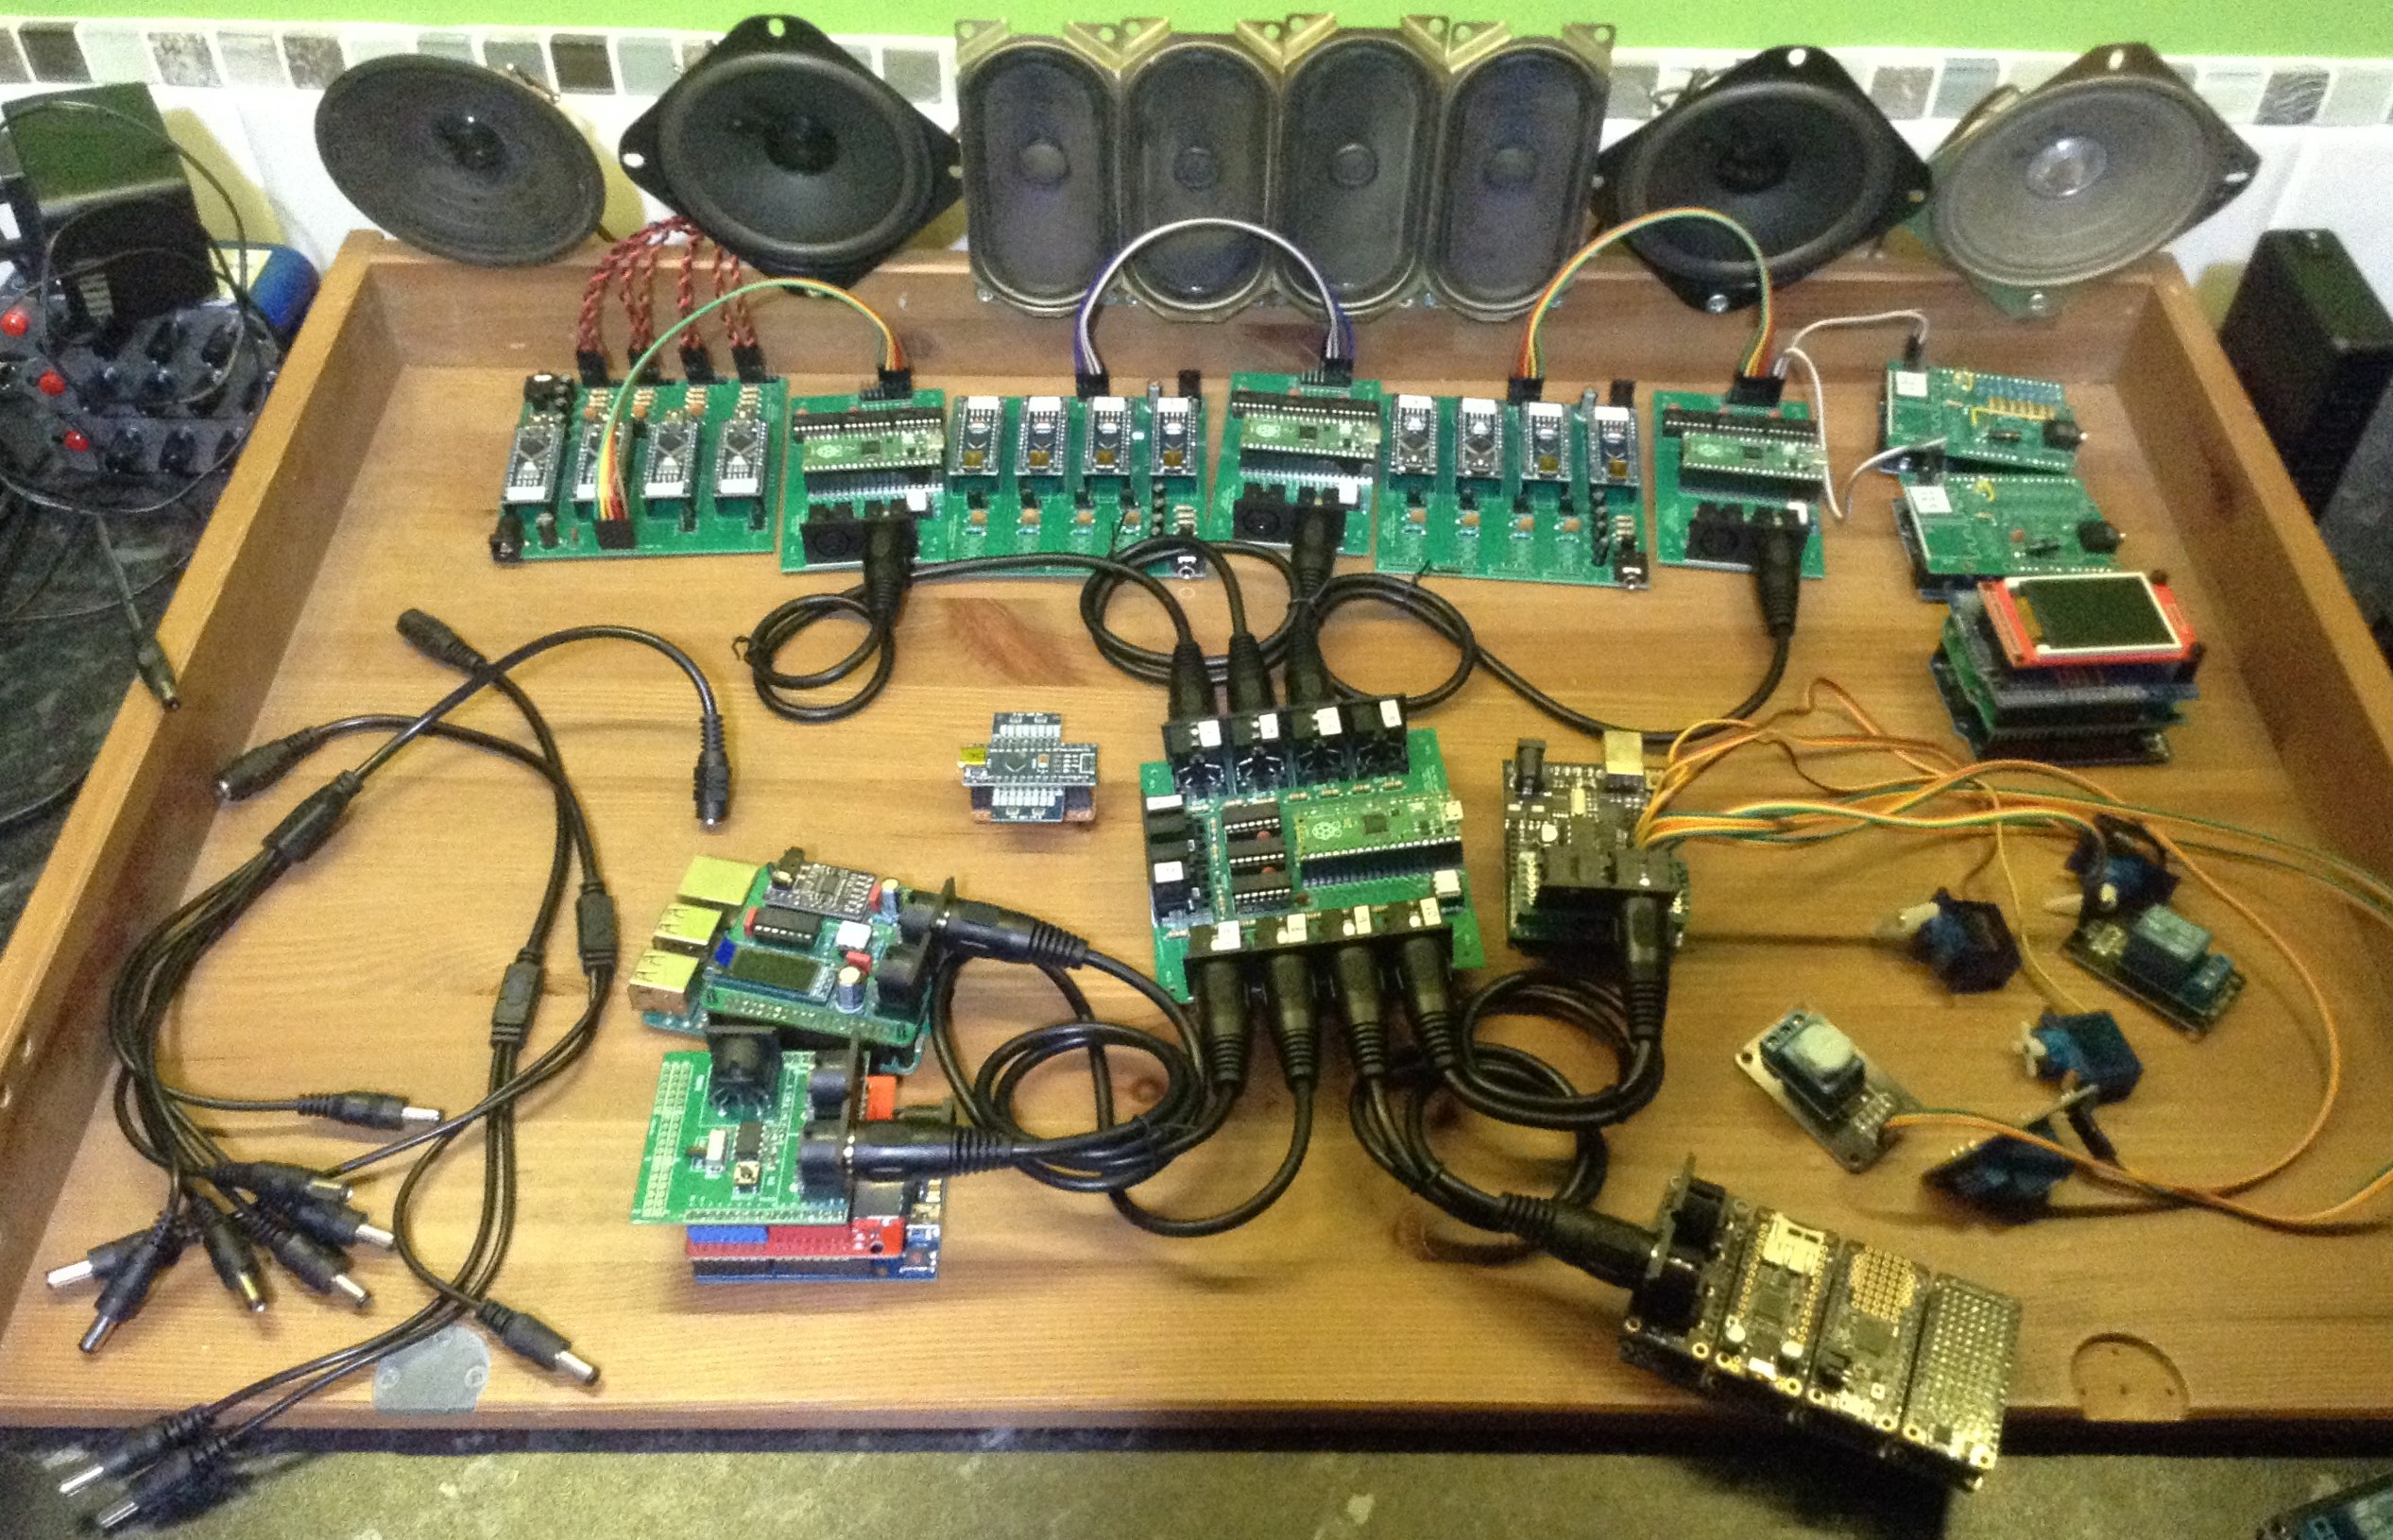
In honour of my 400th post to my blog, and having now designed and built a range of relevant PCBs I wanted to completely take apart the existing Lo-Fi Orchestra and rebuild it from scratch.
This post details how the orchestra has been updated and will hopefully serve as a new explainer for the Lo-Fi Orchestra.
At the end it also includes a few of the extras used in the inaugural performance of Tchaikovsky’s 1812 Overture. The more basic newly built orchestra can be seen in the performances of the Dam Busters March and the Flight of the Bumblebee.
All previous Lo-Fi Orchestra performances can be viewed using this playlist.

Now let’s meet each section in turn and compare the new with the old!
Arduino Tones – MIDI Channel 1
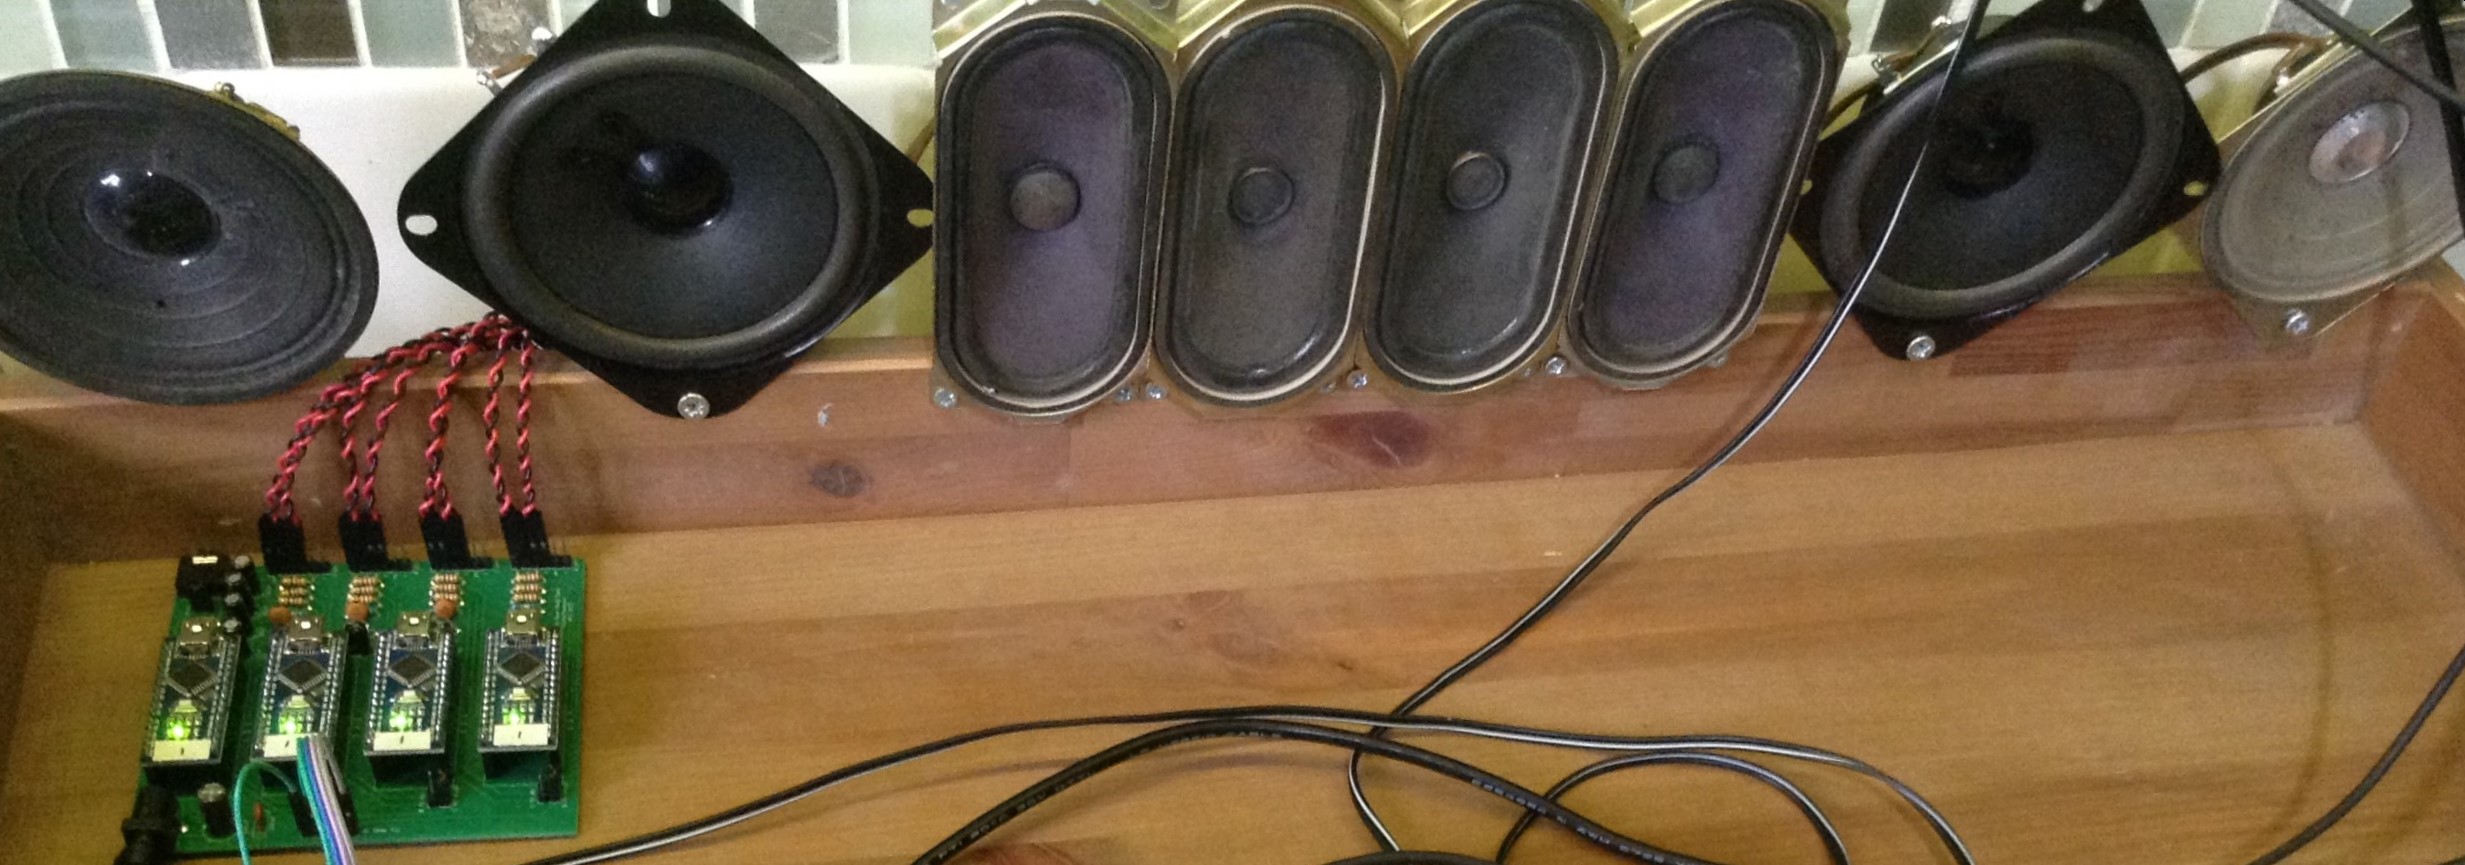
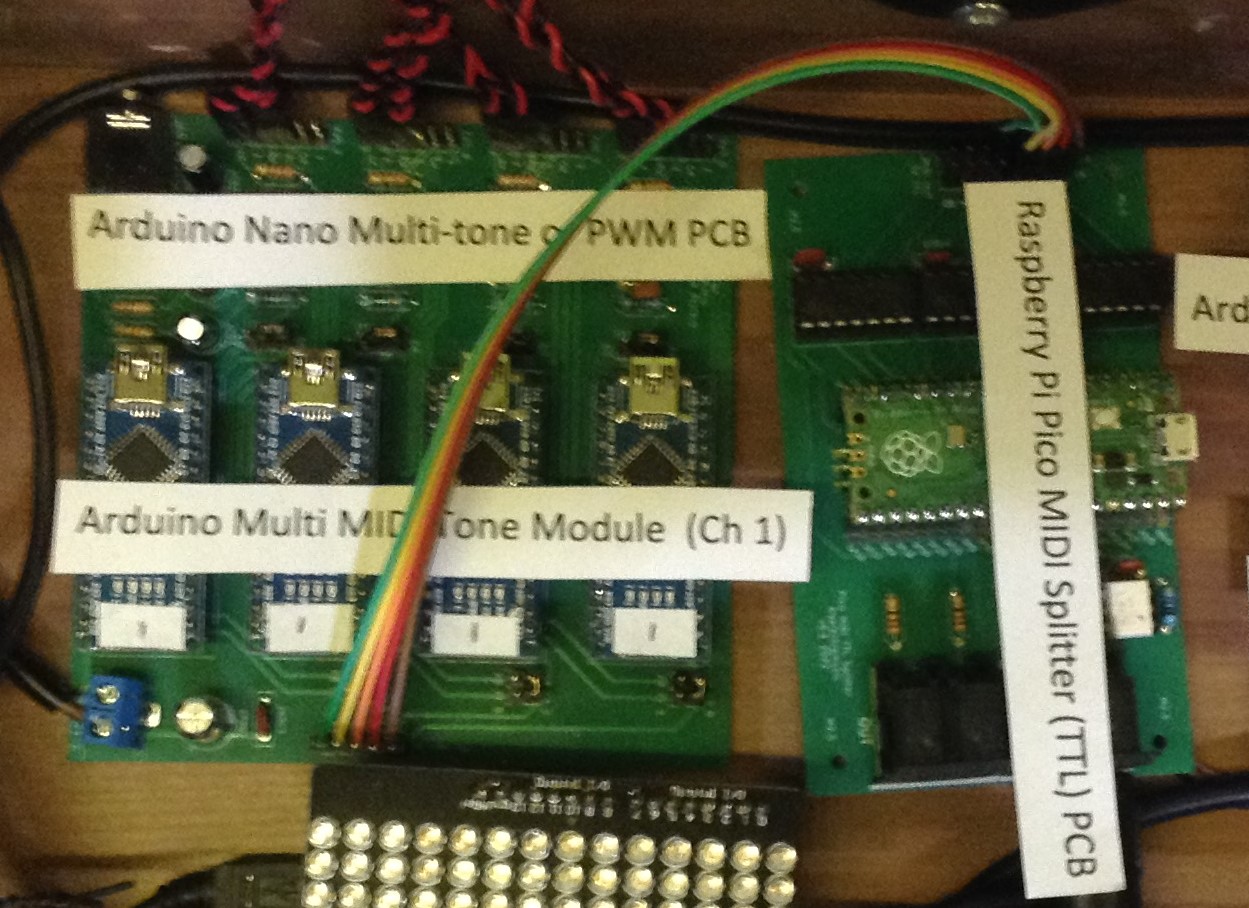
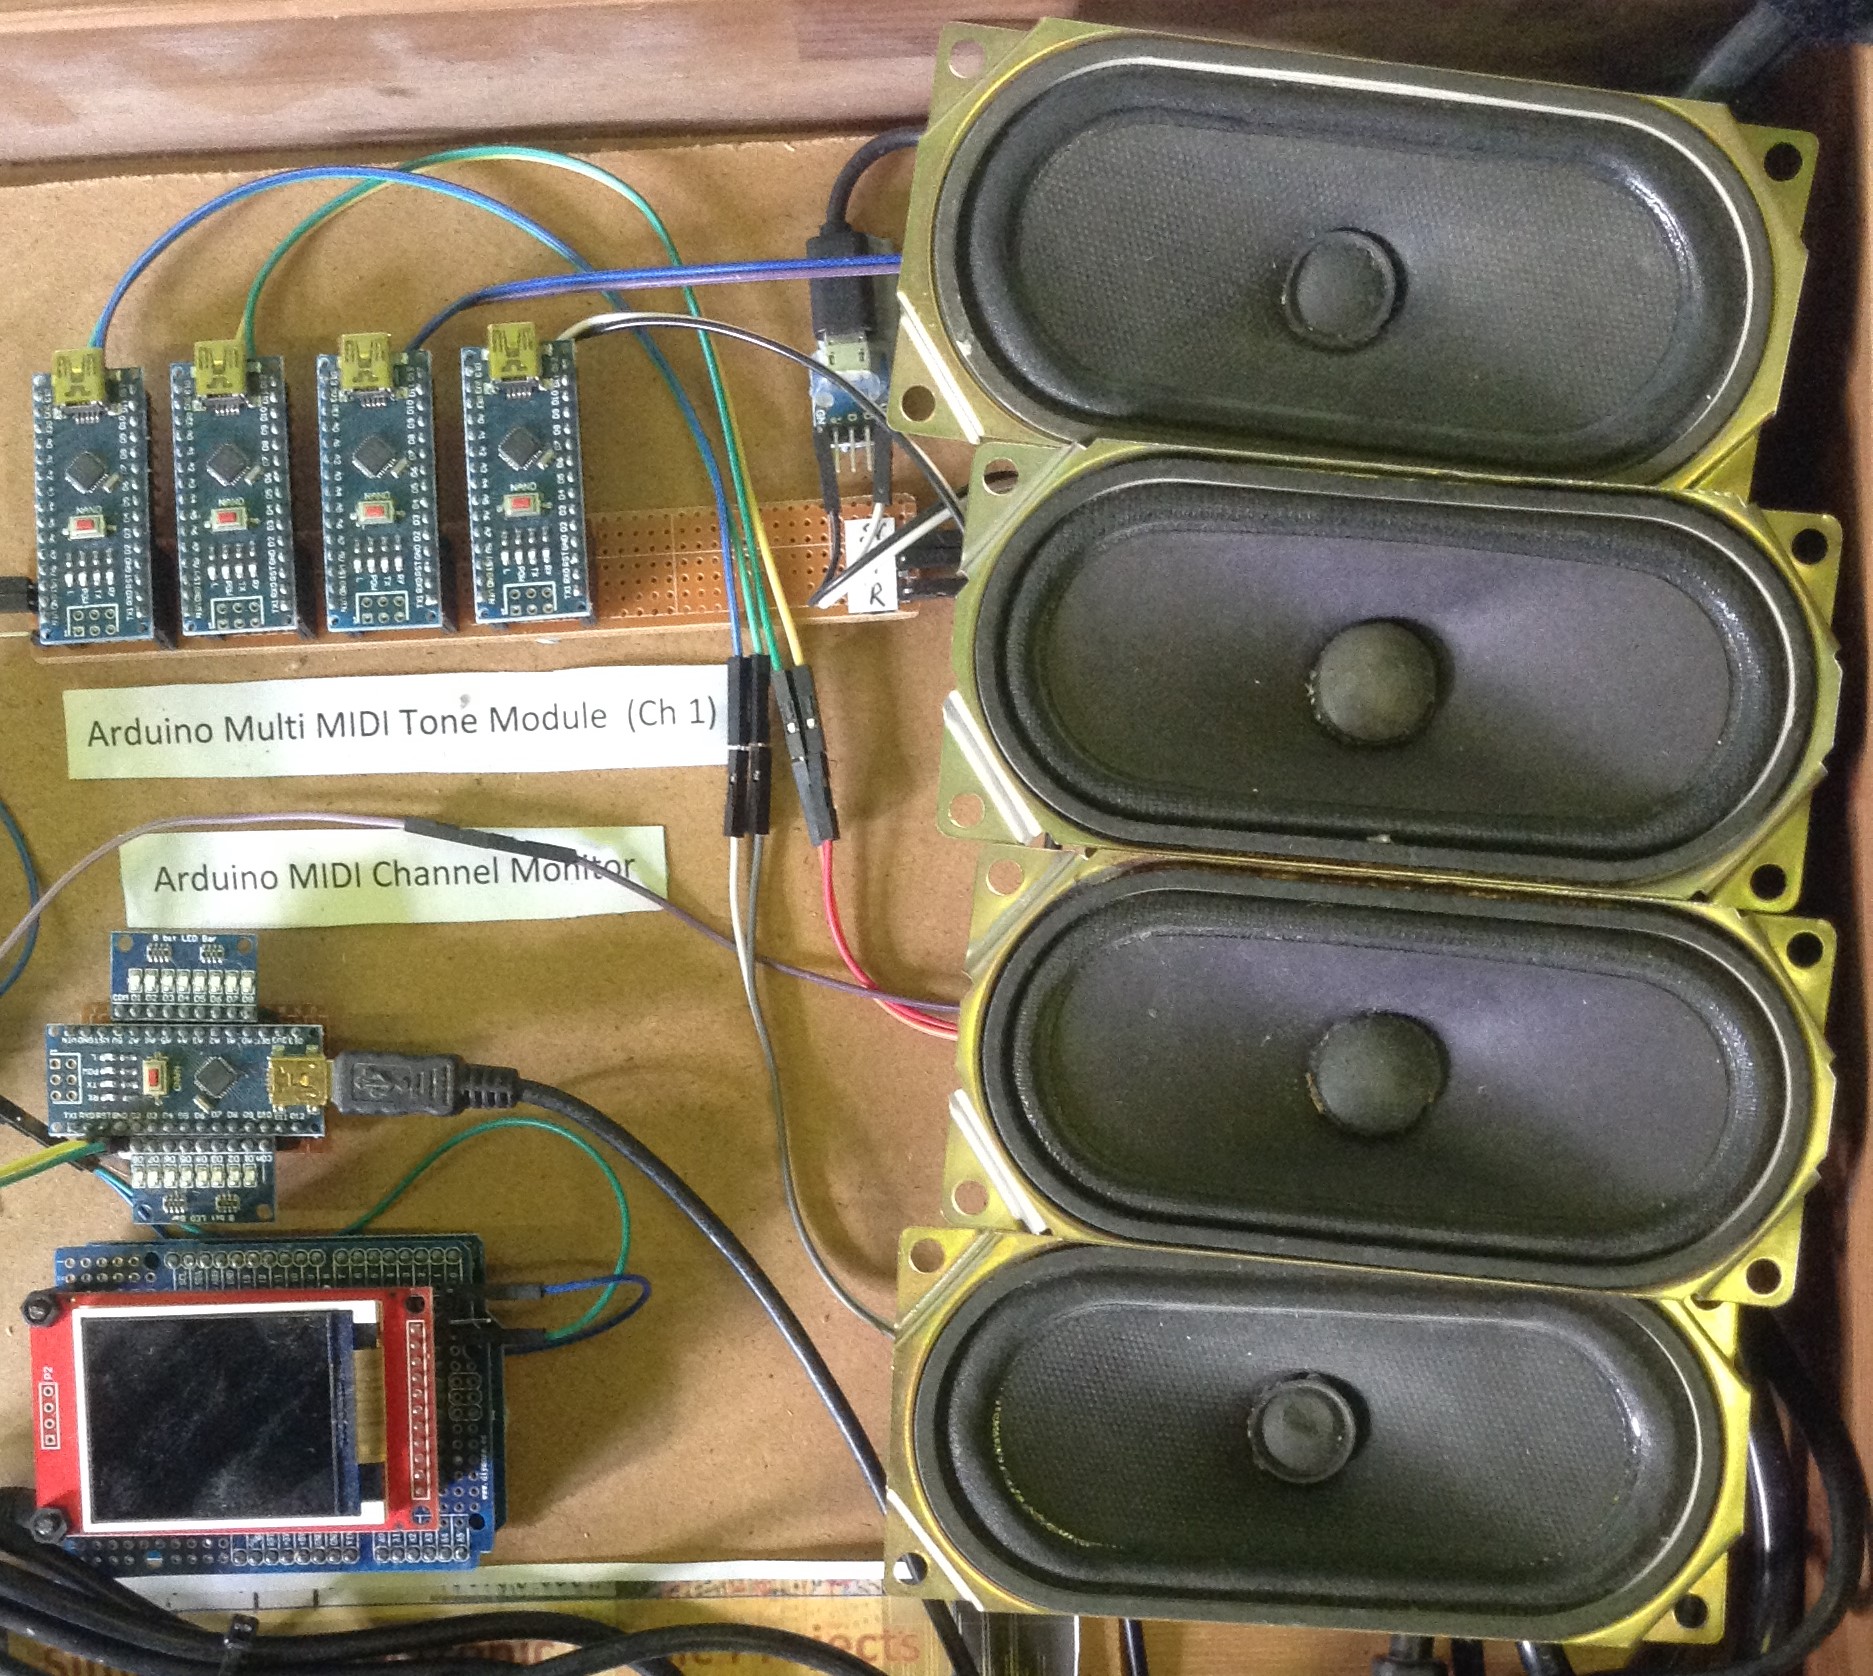
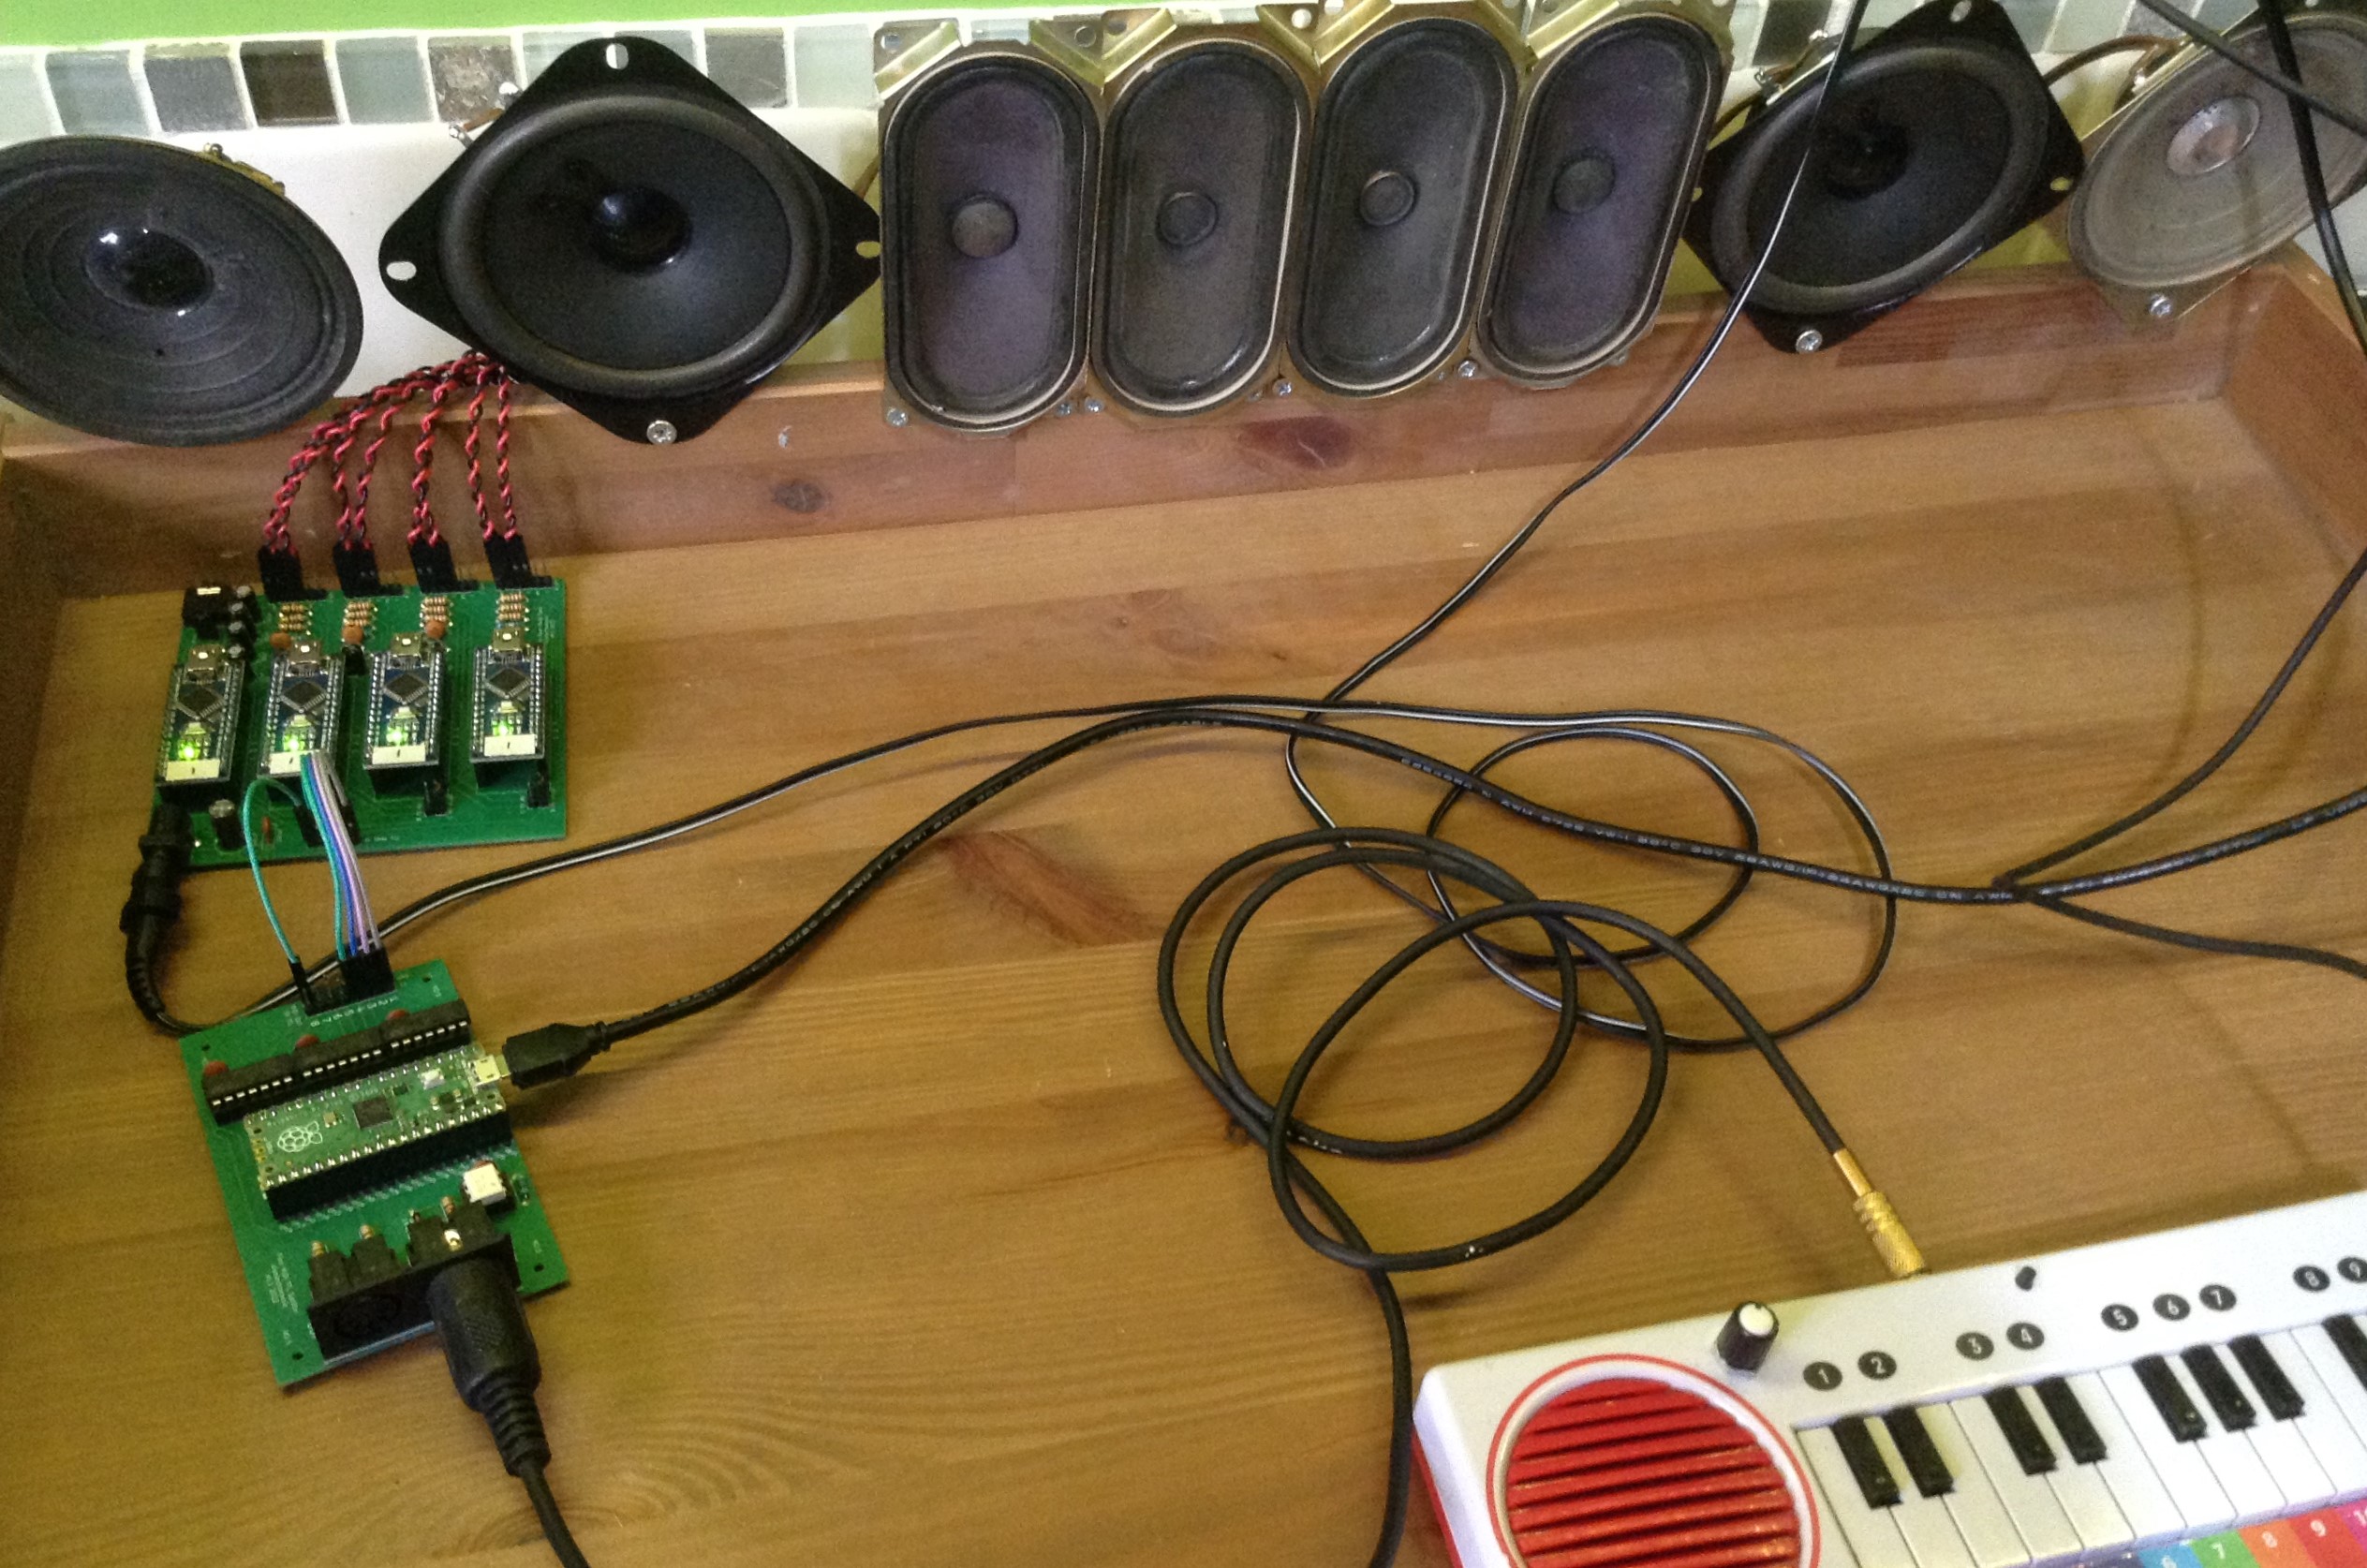
The first section of the Lo-Fi Orchestra is four Arduino Nanos each connected to two speakers for playing simple square wave tones. These tend to be used for “brass” type parts. You can hear them pretty well in the fanfares that open the Procession of the Nobles. The original version, as shown in the last photo, only had one speaker per Nano, so I’ve doubled the capacity.
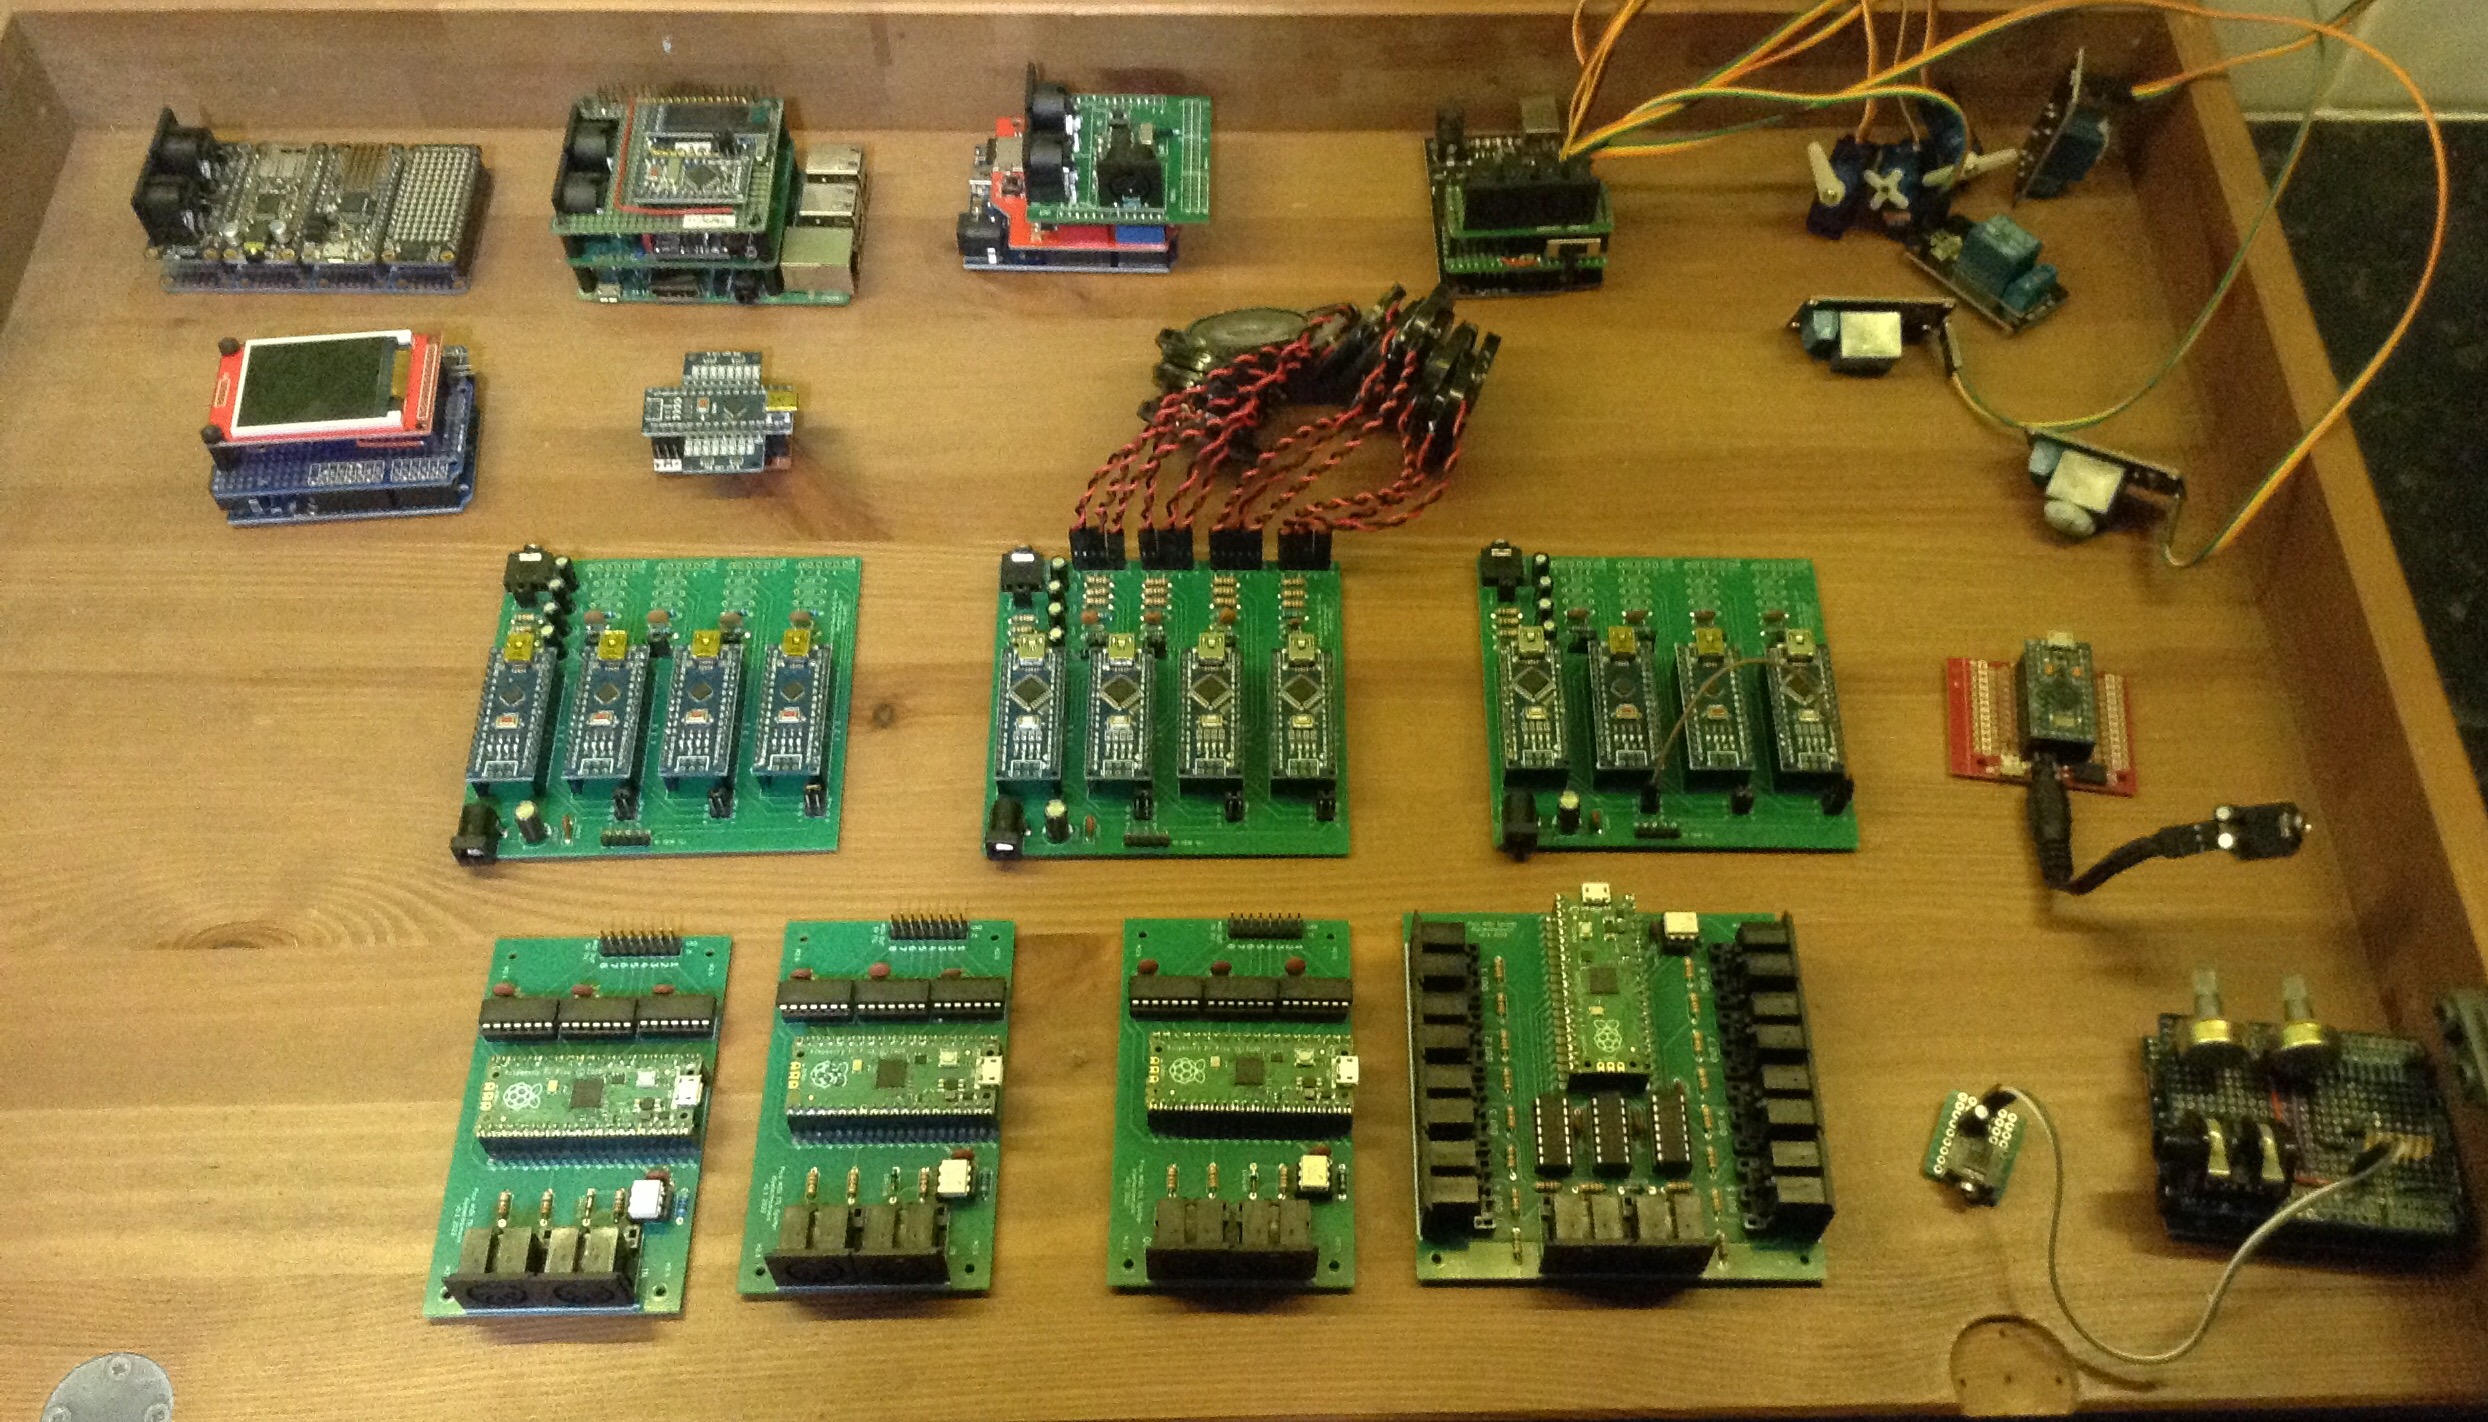
A Raspberry Pi Pico MIDI Splitter (TTL) is used to receive all MIDI data on channel 1 and share it across the four Nanos and eight speakers. It is using a new “note balancing” application. The Nanos themselves are mounted on one of my Arduino Nano Multi-tone or PWM PCBs in “tone” mode.
The basic operating principles can be found here: Arduino Note Generator and full details of the setup as used in the Lo-Fi Orchestra can be found here: Arduino Multi MIDI Tone Module.
If you are interested in going further with Arduino tones, see:
Basic Digital Synthesis – MIDI Channels 2 and 3
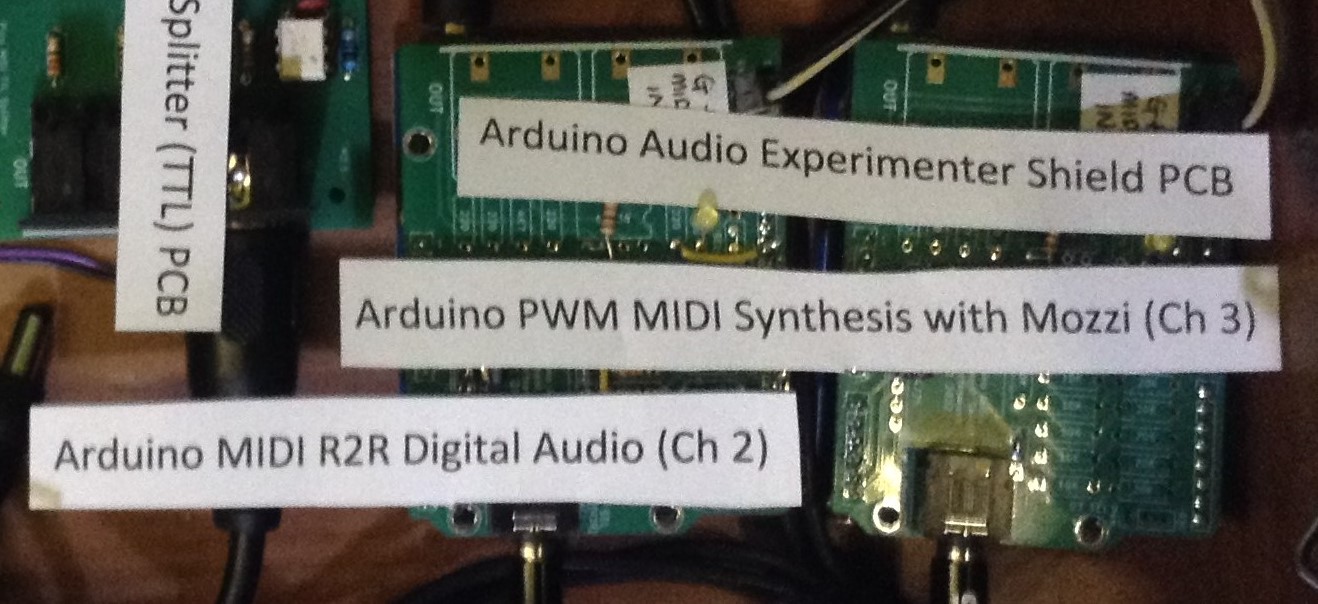
The two main projects in this photo are:
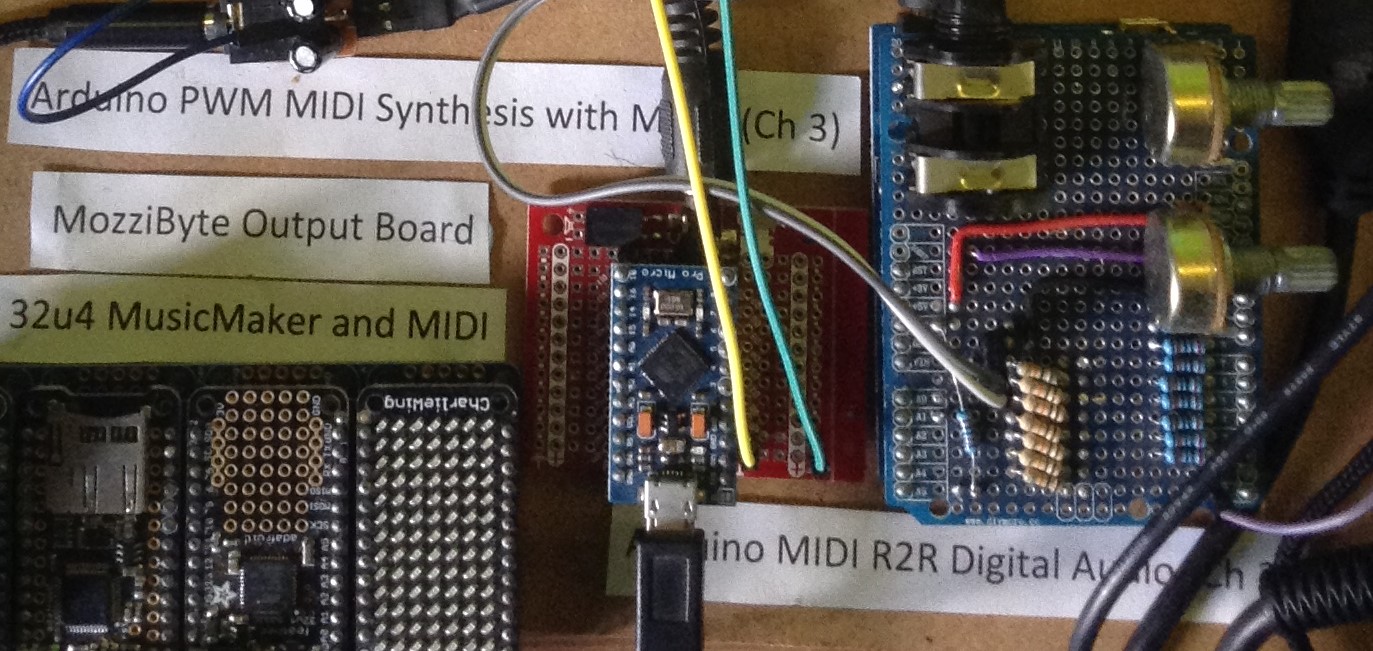
The R2R Digital audio is a home-made “R2R” ladder circuit on an Arduino Uno. This provides a simple 8-bit digital to analog converter on Arduino D2-D9 ideal for showing how wave-table based direct digital synthesis works. The parameters are fixed to give quite a pure monophonic sound. The original version (below photo, on the right) used a home-made shield. The new version uses the R2R section of my Arduino Audio Experimenter Shield PCB.
The PWM Mozzi synthesis was originally an Arduino Pro Micro sitting on the MozziByte Output Board but it has been replaced with an Uno and the PWM section of my Arduino Audio Experimenter Shield PCB. Mozzi is an extensive synthesis library that is used in many projects on this site. This particular build is simply using one of the demonstration examples to generate a relatively pure pulse-width modulated (PWM) output on the Arduino D9 pin.
These two boards are usually given woodwind parts, especially flutes. They are connected to two of the outputs of a Raspberry Pi Pico MIDI Splitter (TTL). You can hear the originals quite well in the opening tune of the Serenade and the opening of Venus from The Planets. They also feature prominently in the scalic runs in the Sky Toccata!
Full details are provided on the above links. For taking this further, explore the Mozzi category on my blog and see the Mozzi projects coming up next!.
Mozzi FM Synthesizer – MIDI Channels 4 and 5
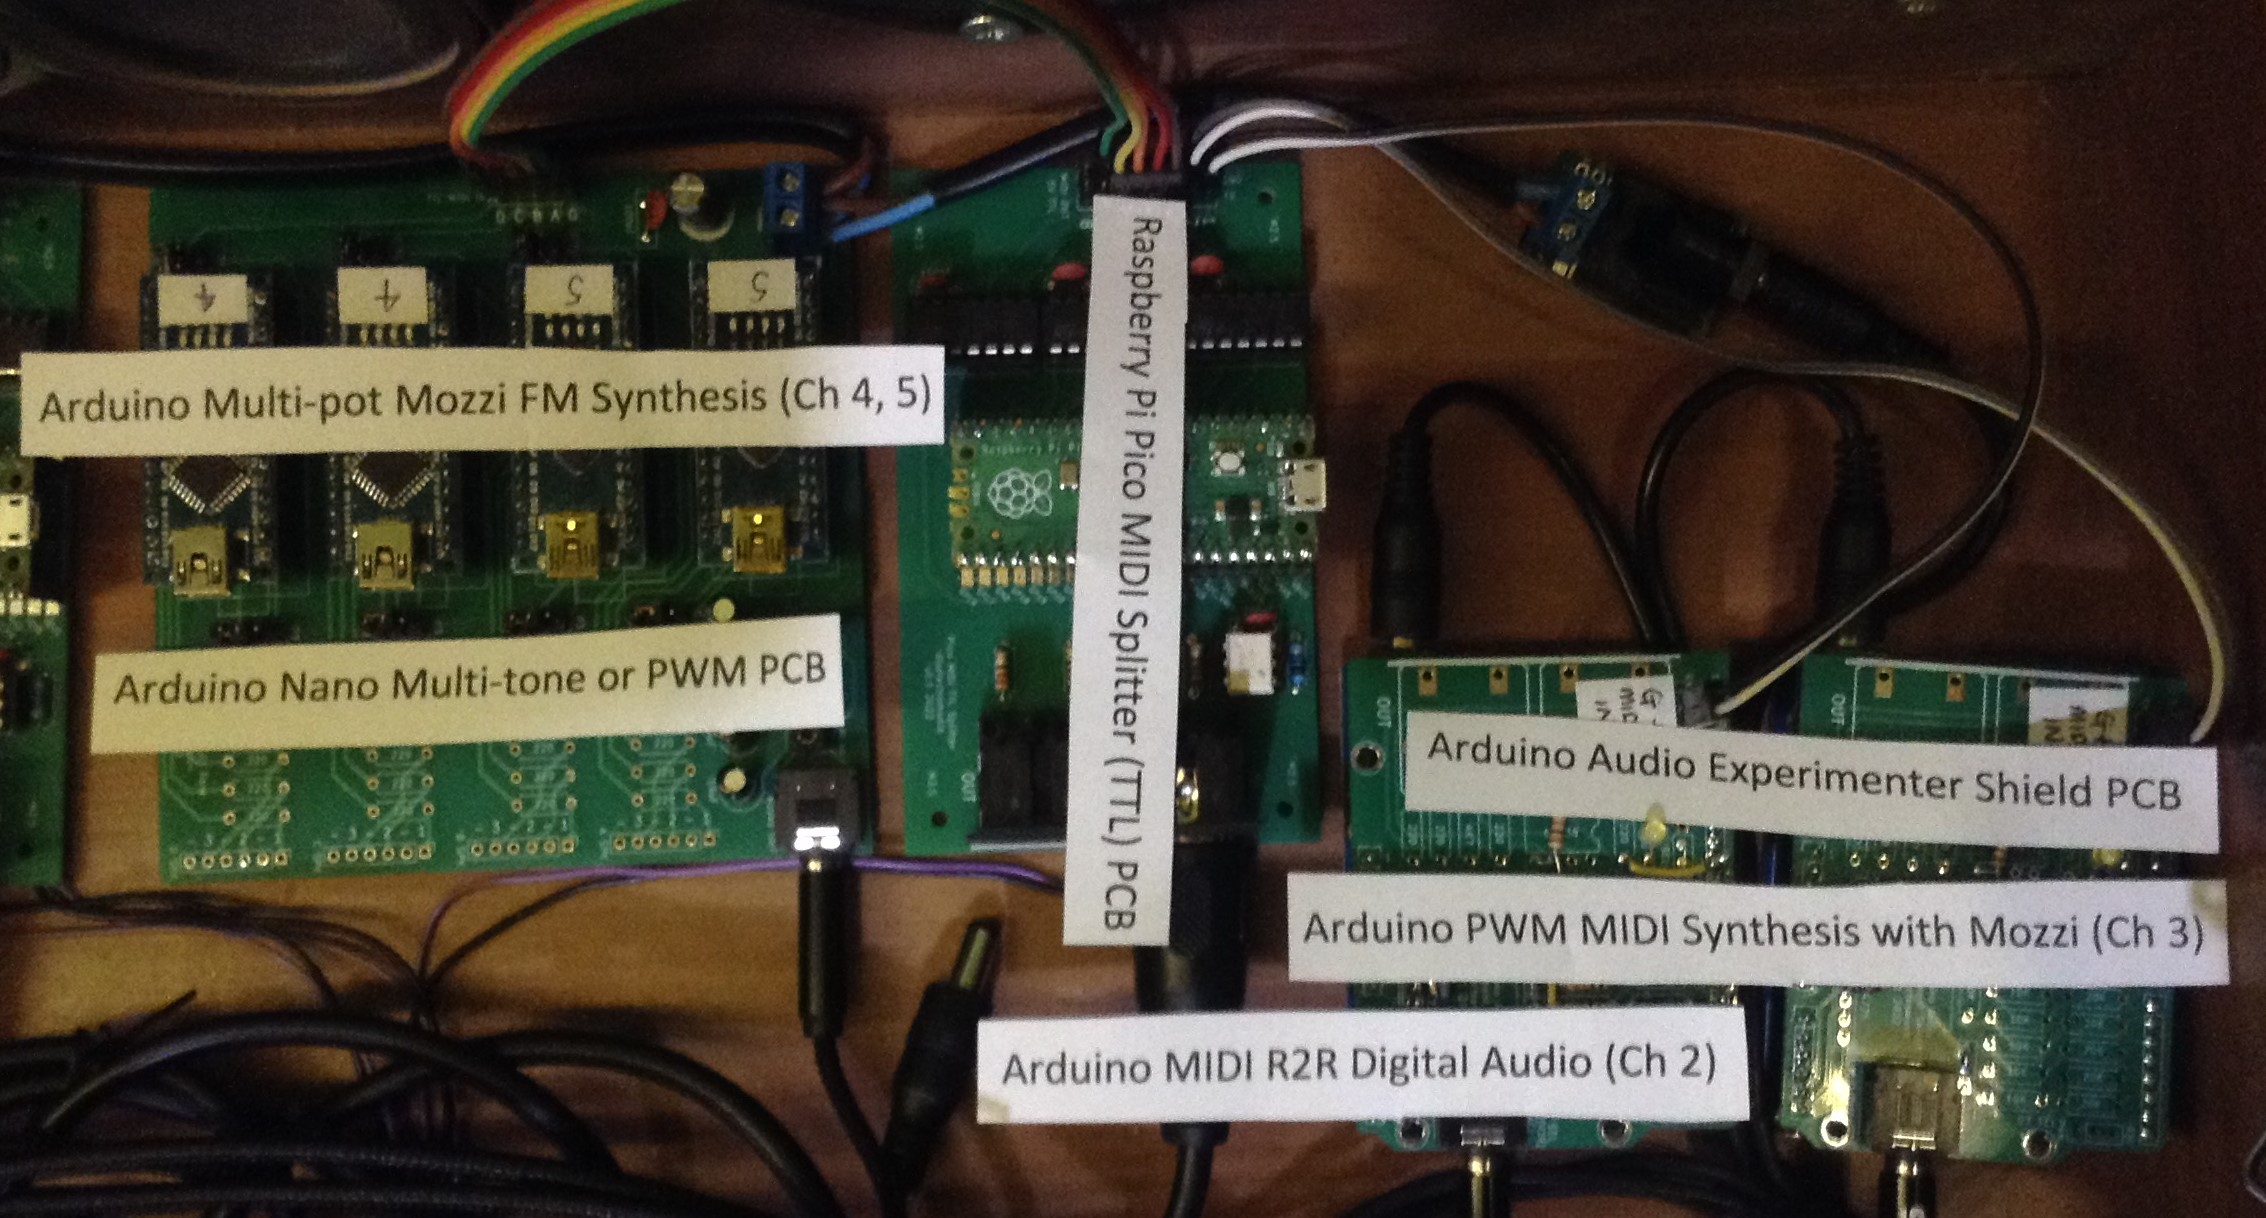
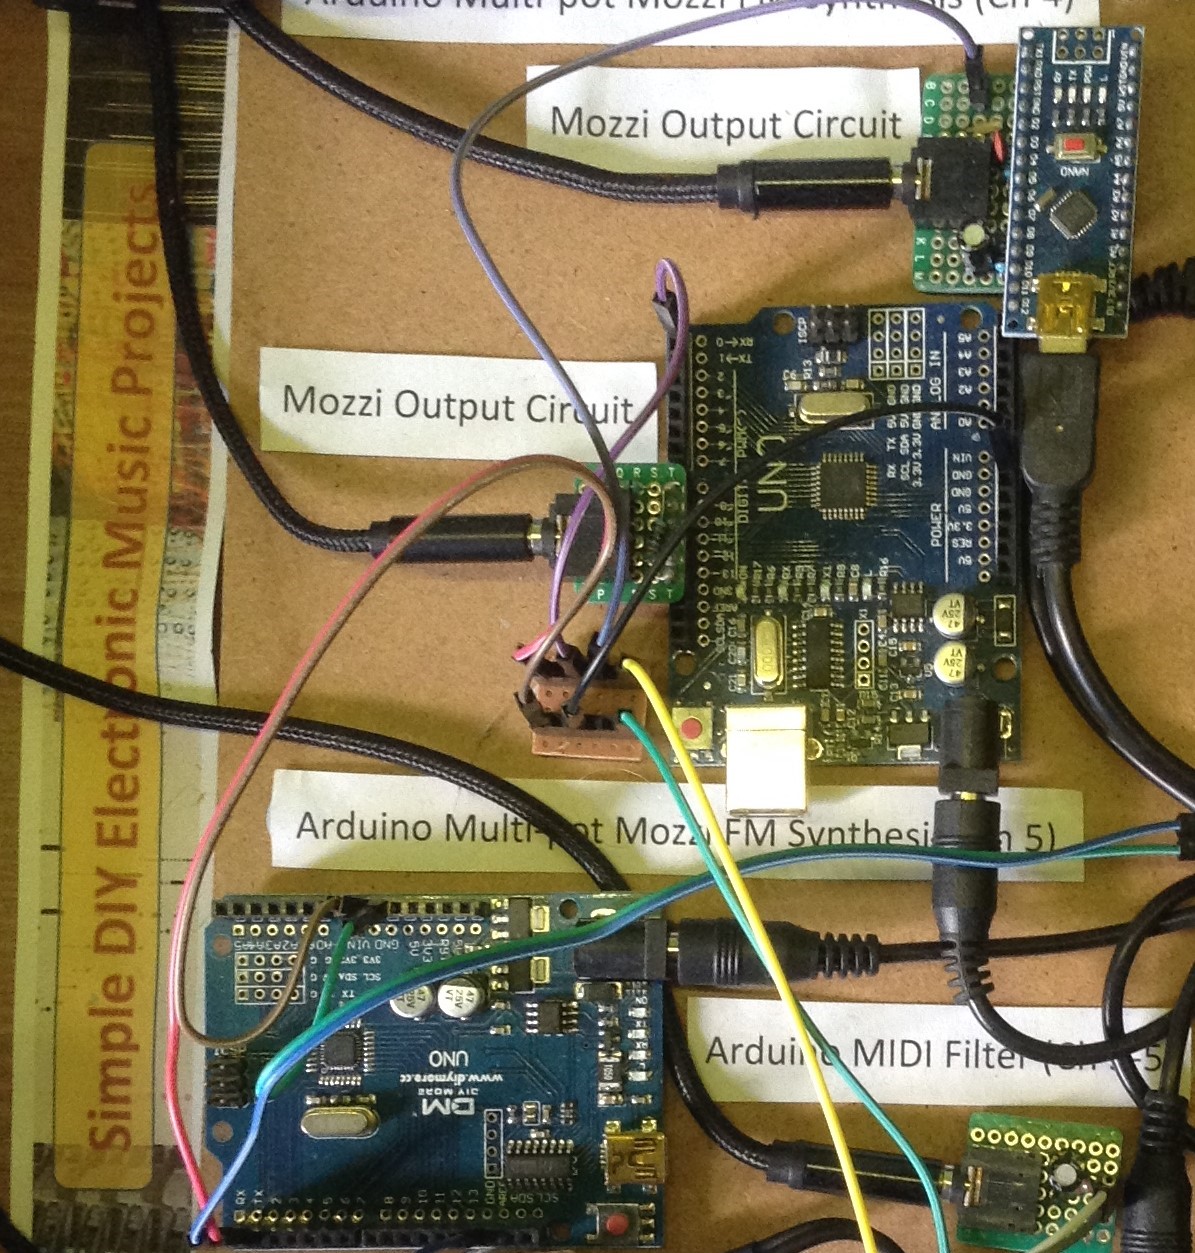
The original two boards, the Nano at the top and Uno in the centre of the lower photo, were also using the Mozzi synthesis library, in this case utilising frequency modulation (FM) synthesis. They have now been replaced by four Nanos on a Arduino Nano Multi-tone or PWM PCB and they have been configured, using the same sketch as before (with a fixed set of synthesis parameters), to have two on channel 4 and two on channel 5. Typically these are used for middle woodwind, such as clarinet or saxophone, and in some early performances, also sometimes horn parts. There have been two versions used in the orchestra. The first, a more harsh one, you can hear in the main tune from Good Omens and Goldeneye, and the softer one in the opening, rocking chords for Saturn from The Planets.
A single Raspberry Pi Pico MIDI Splitter (TTL) distributes MIDI channels 2, 3, 4 and 5 across these four Nanos and the two Unos mentioned previously.
You can read about the core principles behind these projects here: Arduino Multi-pot Mozzi FM Synthesis. But as I say, each sketch has been built with a fixed set of synthesis parameters rather than using potentiometers.
If you are interested in exploring these further, grab some potentiometers and look at Arduino FM MIDI Synthesis with Mozzi.
Mozzi String Synthesis – MIDI Channels 11 to 14
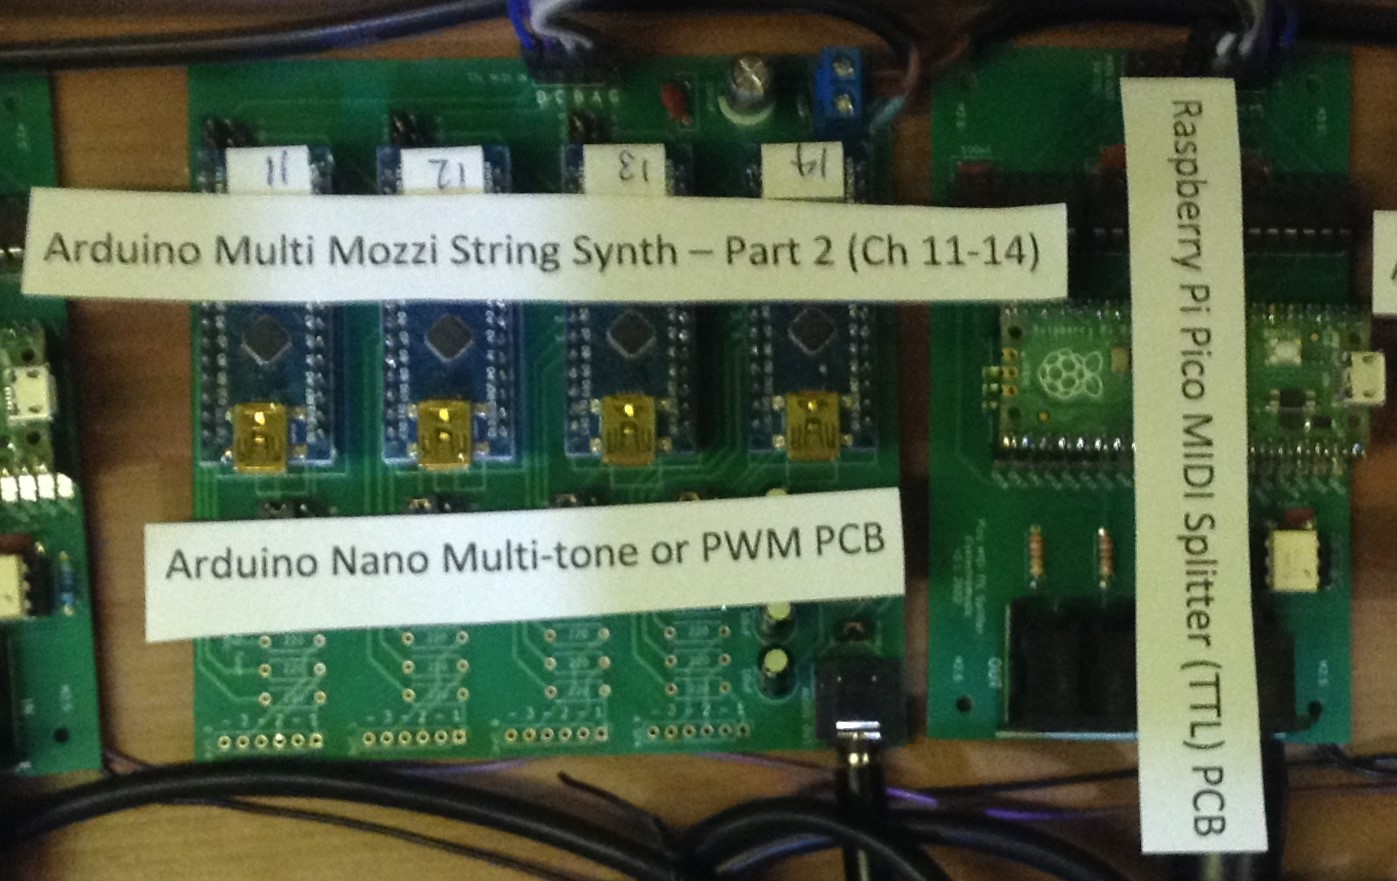
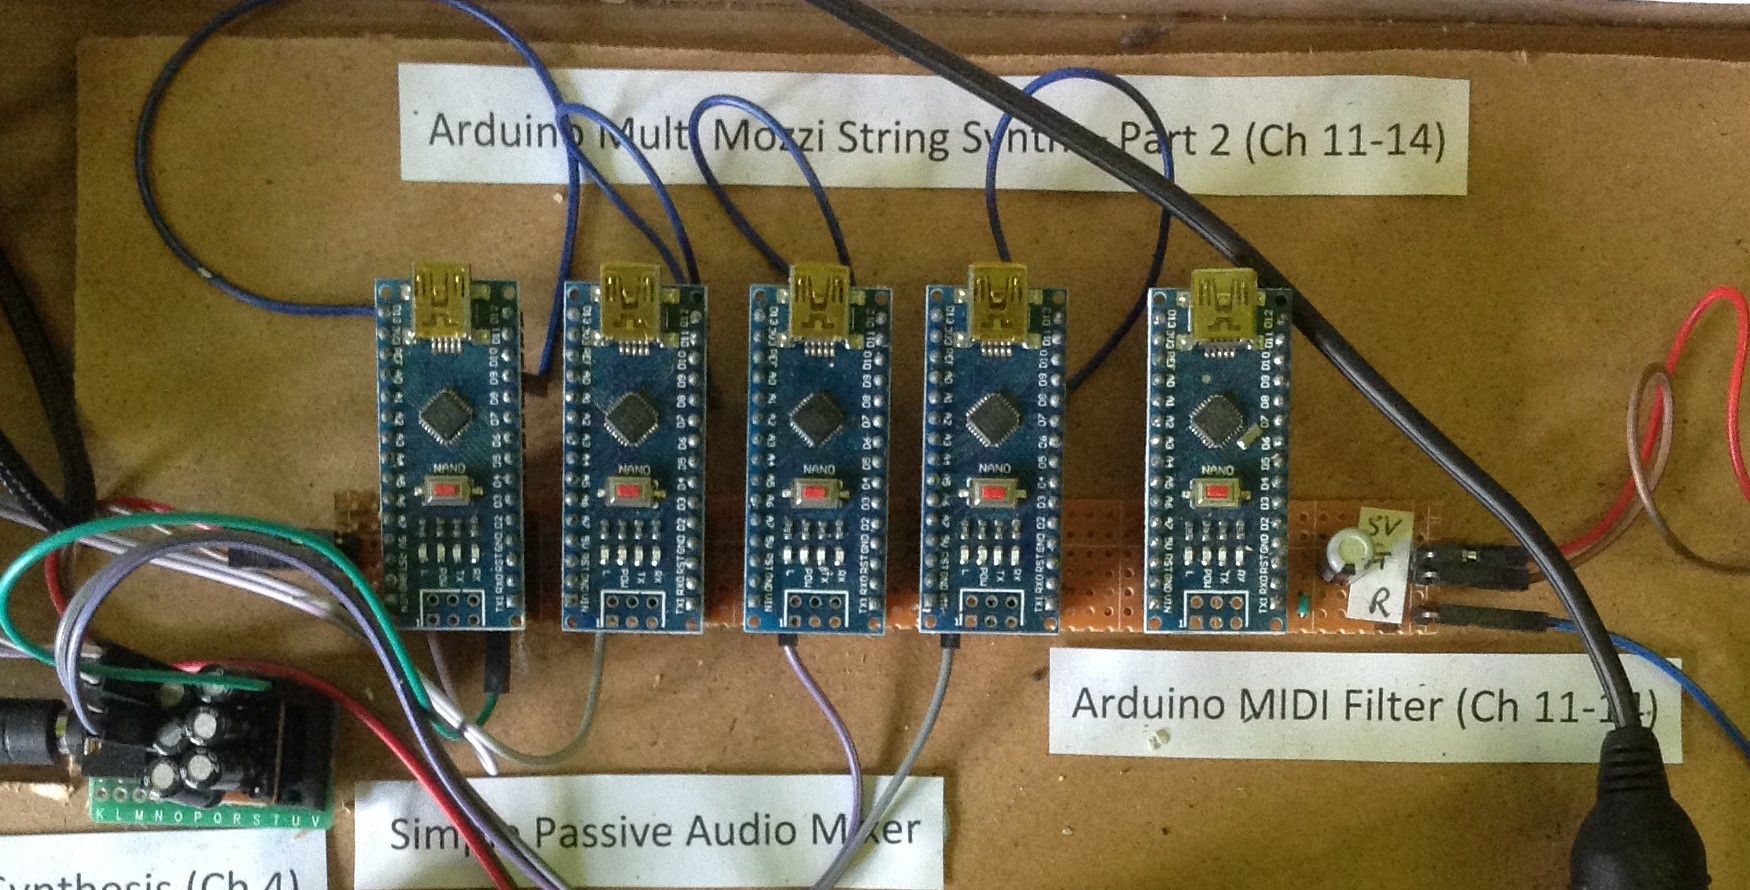
My original Arduino Multi Mozzi String Synth (bottom) had four Arduino Nanos with MIDI filtering provided by a fifth, all outputting via a Simple Passive Audio Mixer into a single output feed. This has all been replaced with a Raspberry Pi Pico MIDI Splitter (TTL) feeding a Arduino Nano Multi-tone or PWM PCB in PWM mode via D9 (the Mozzi output pin).
Mozzi has many synthesis modes. The previous projects looked at FM synthesis. This project relies on additive synthesis. With additive synthesis various waveforms are combined in specific ratios of frequencies to create more complex waveforms. Once again, this project utilises a fixed configuration of synthesis parameters which I tend to use for string parts. You can hear them in action in Palladio and quite a lot in the Dance of the Tumblers, but I think their best moment is the opening to Jupiter from The Planets.
For details of the specific set up used with the Lo-Fi Orchestra, see Arduino Multi Mozzi String Synth – Part 2. For the specific principles used for the sound generation, see Arduino Mozzi Additive Synthesis.
Relay Servo Drumkit – MIDI Channel 10
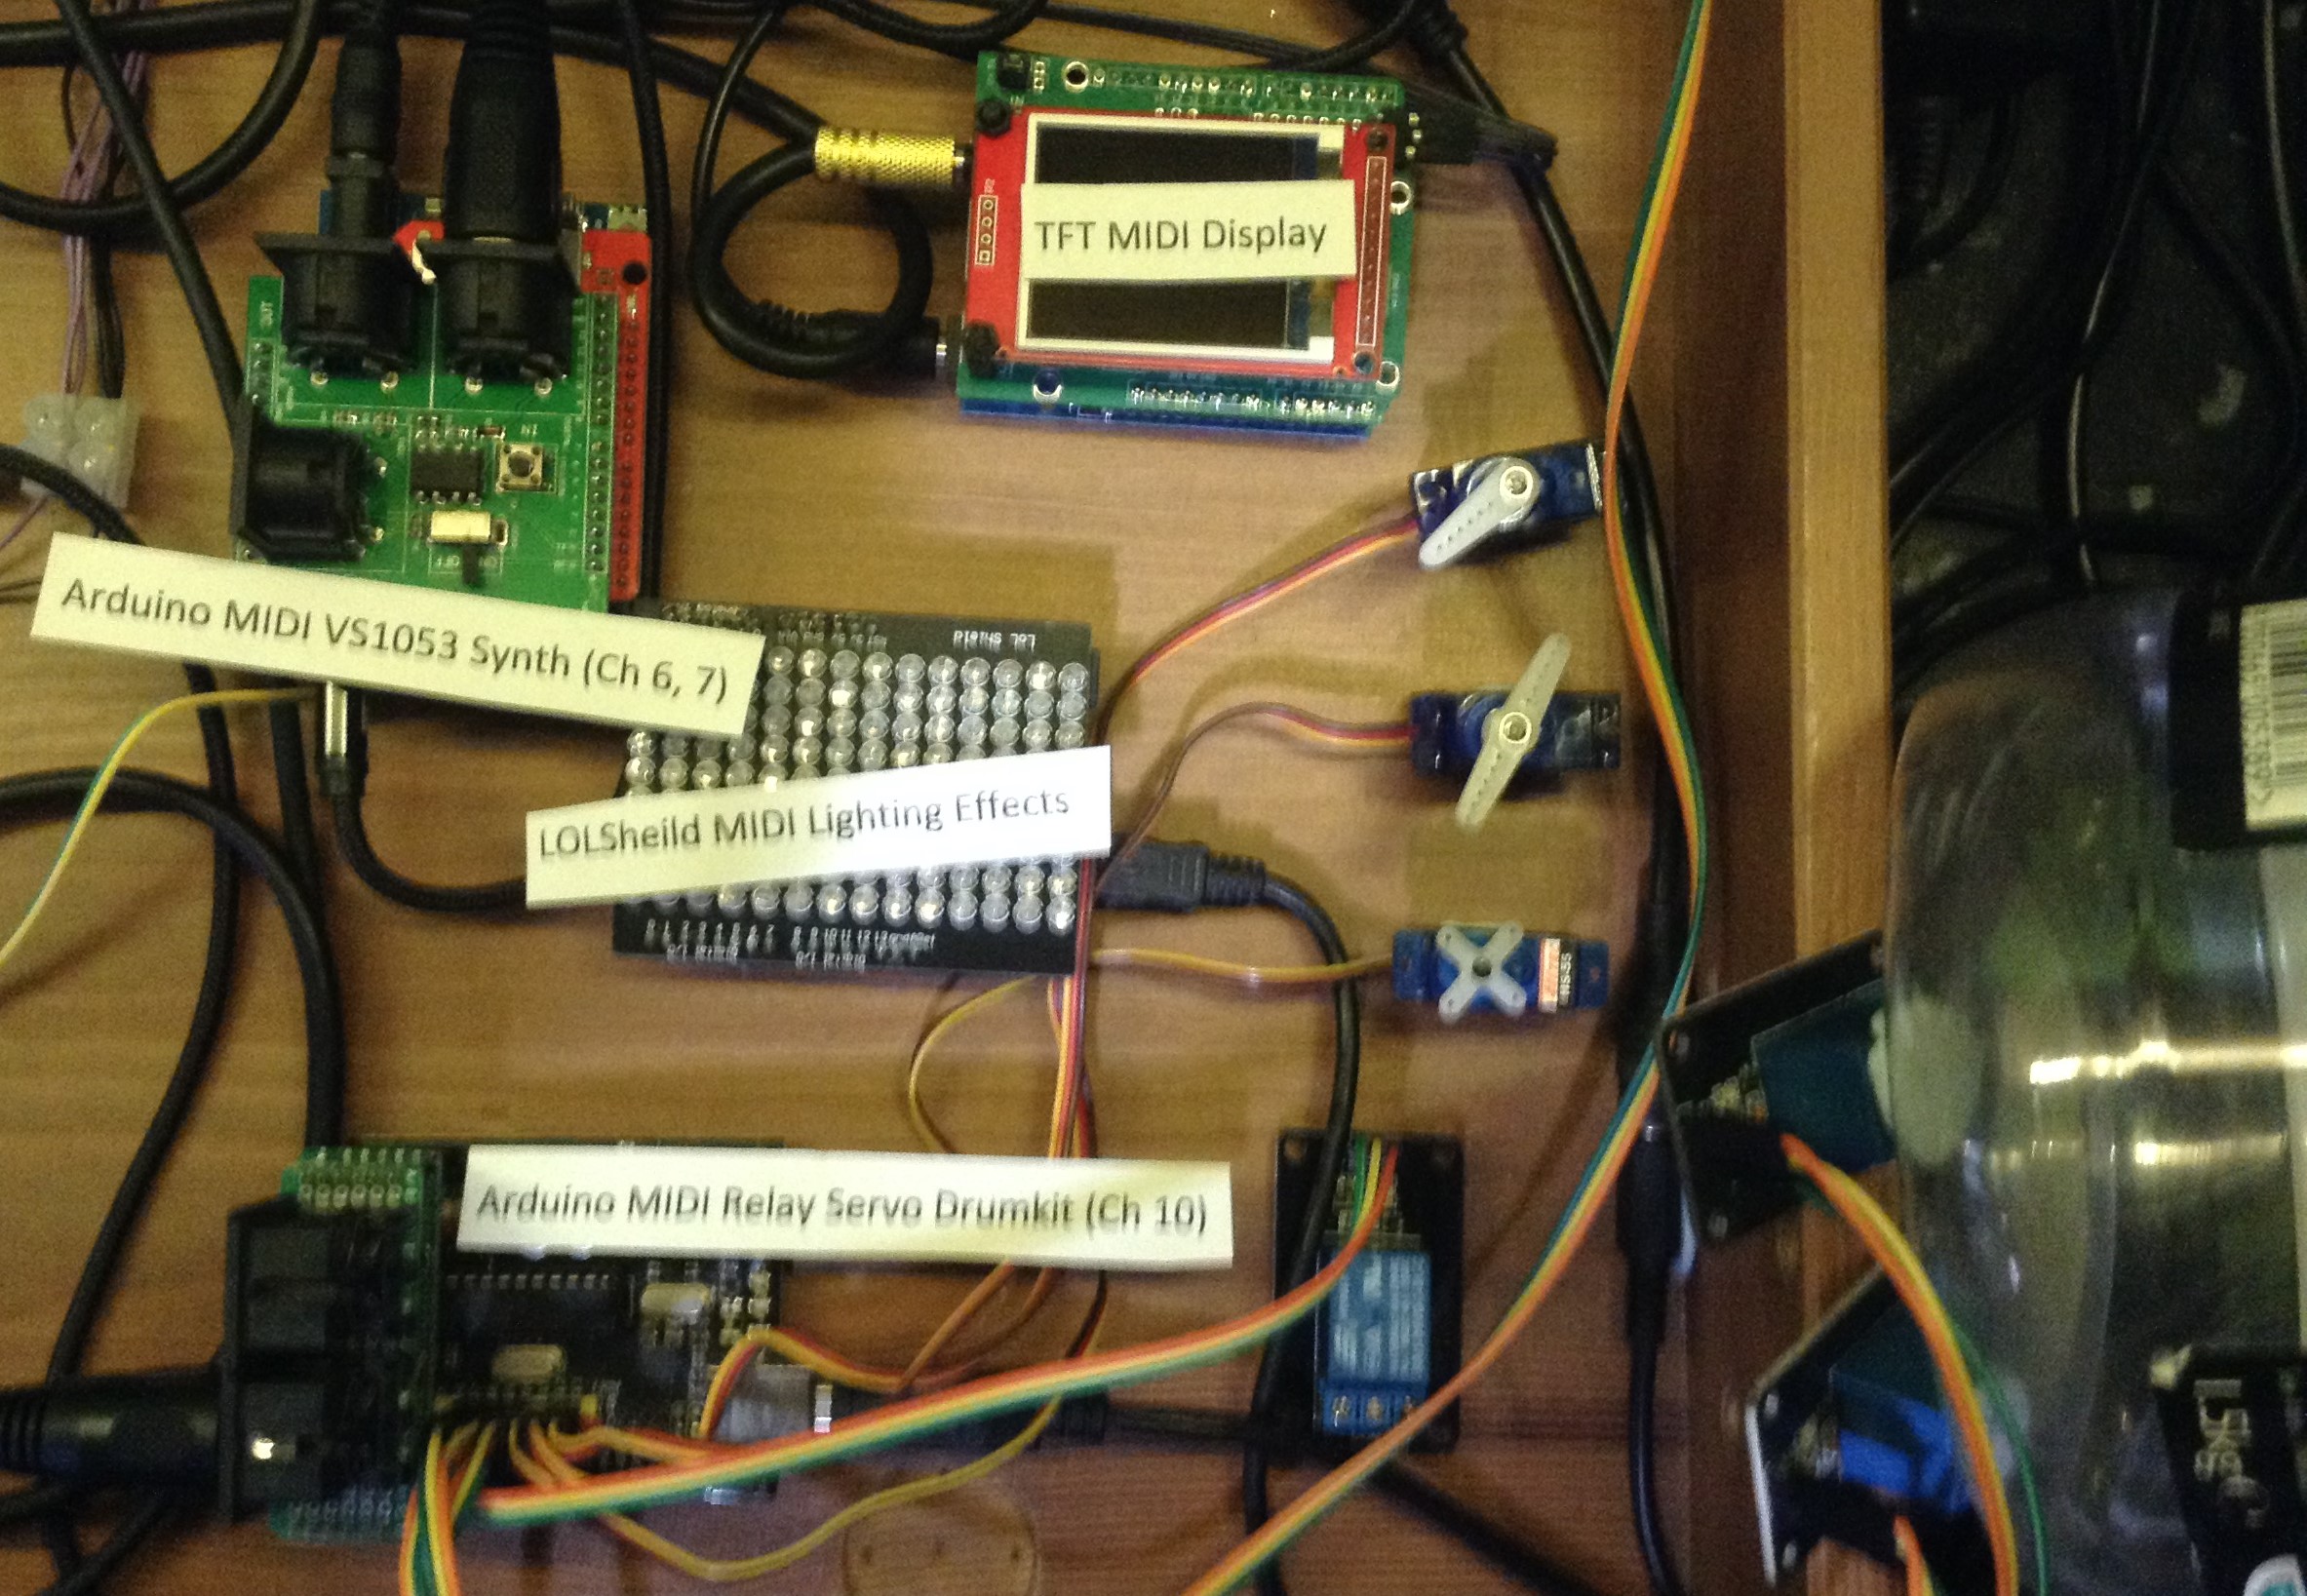
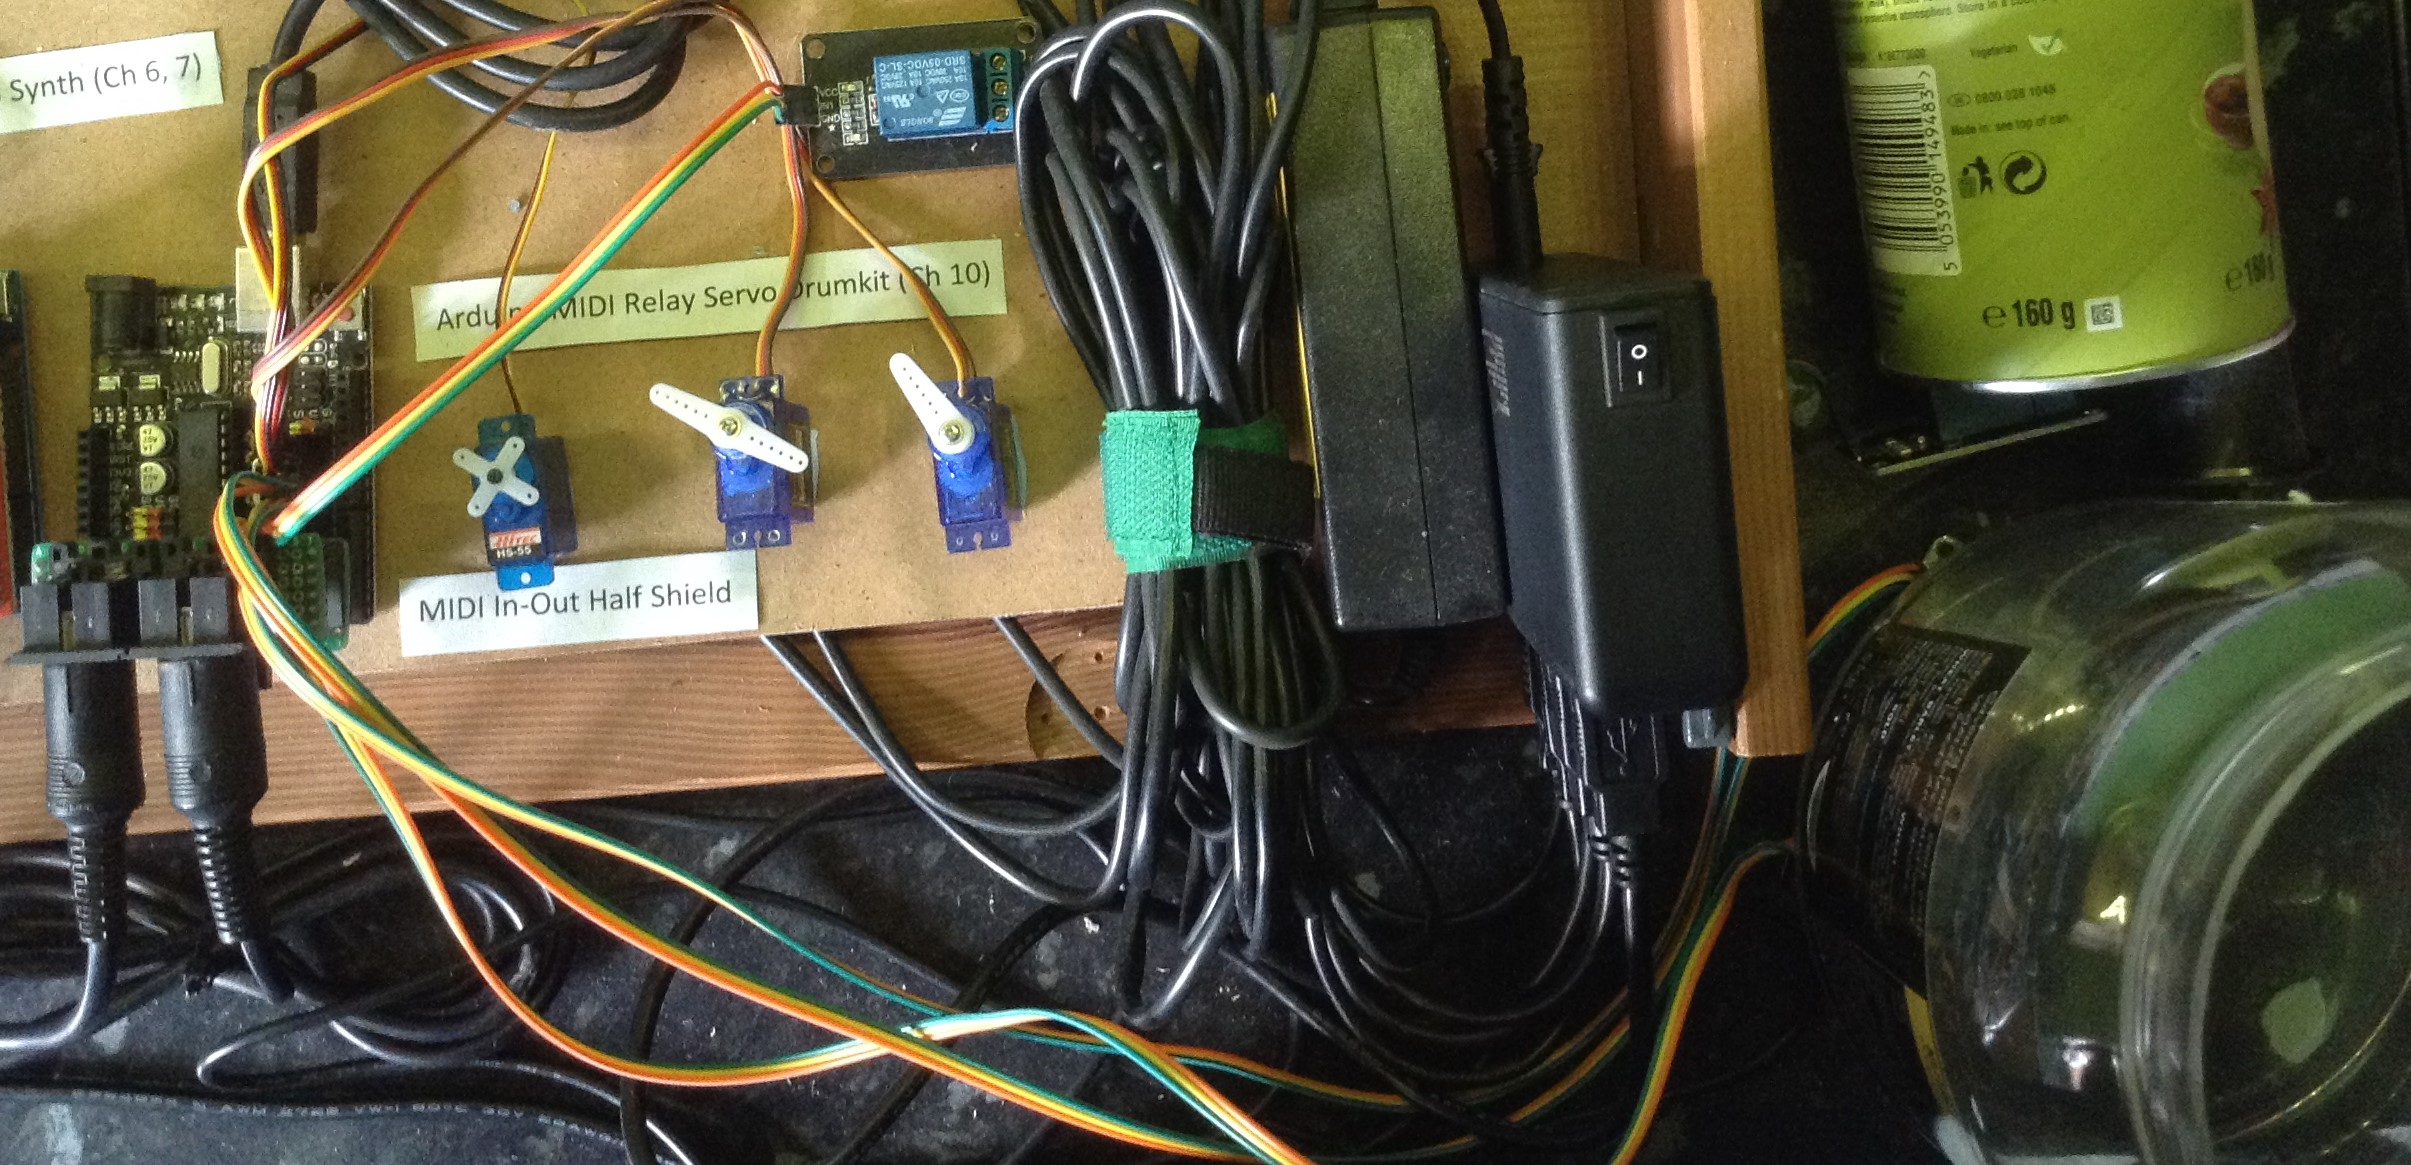
This is one section that was just re-used “as is”. This is the Arduino MIDI Relay Servo Drumkit which is using an Arduino Uno clone that has extra IO pins that makes adding relays and servos particularly easy. It is using the home-made MIDI In-Out Half-Shield.
The relays’ clicking provides the “drums”. There is a single relay that is mapped to “snares”. Another acoustically connected (using bluetack!) to a Pringles can for mid-sounds like toms, and two relays attached to a large tub for a bass drum “kick”. For a good demonstration of their use as a kit, listen to the Sky Toccata or John Miles Music or any of the ELO Concerto for a Rainy Day. To hear them in a more orchestral setting, try Ravel’s Bolero or the March to the Scaffold.
The servos are used whenever I need cymbals. I’ve used three different arms, but to be honest, they mostly sound the same! Again you can hear them best in the Sky Toccata.
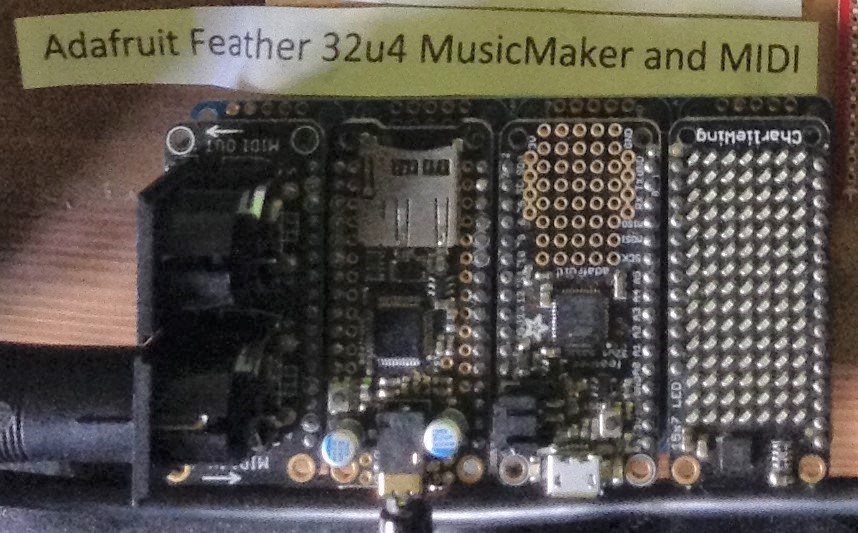
VS1053 MP3 Shields – MIDI Channels 6, 7, 9
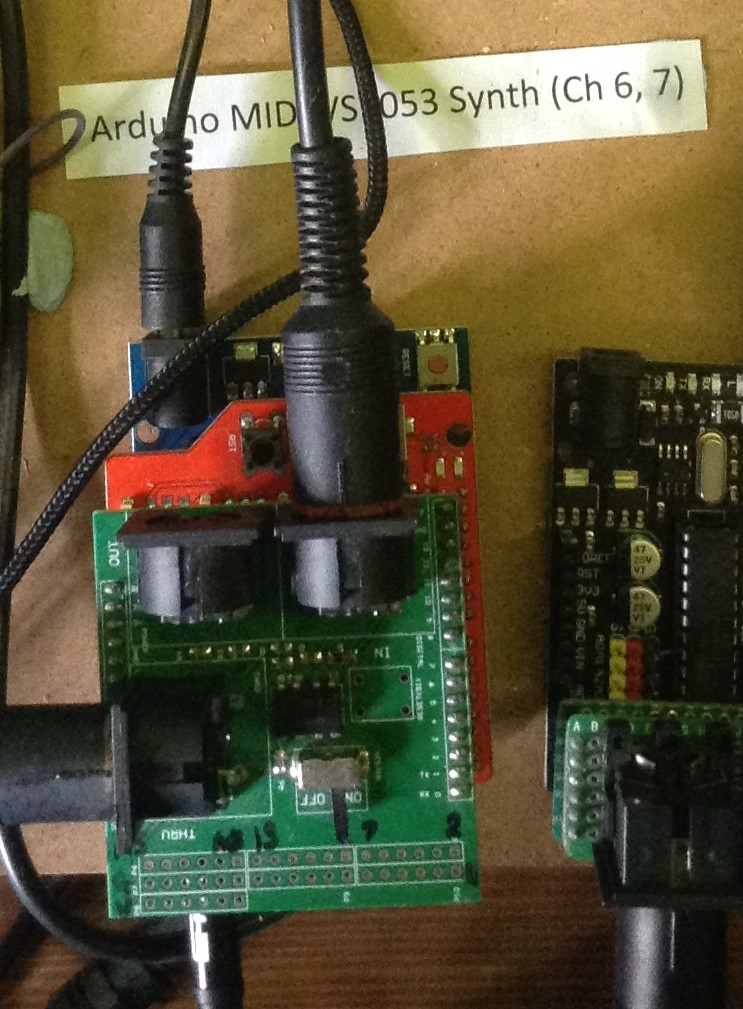
These are two more projects that have simply been used “as is” in the new version (I’ve kept the original photos above). They are two actual synthesizer modules, both based on the VS1053 chip. This is often sold as an “MP3 player” device, but it can also play MIDI files. And if you configure it appropriately it will take a MIDI IN feed and act as a General MIDI sound module with a complete range of built-in voices.
The first instance (on the left) is a cheap VS1053 shield for an Arduino Uno, used here in conjunction with an off-the-shelf MIDI shield. The second instance (on the right) is the Adafruit MusicMaker Wing for its 32u4 Feather board. This is also used with the Adafruit MIDI wing and a Charlieplexed LED display.
The VS1053 shield listens on MIDI channels 6 and 7 and is configured for a bass guitar and acoustic guitar. The bass is used as a double bass in all the orchestral pieces. I tend to use the acoustic guitar for things like harp sounds too. To hear the guitar, listen out for the Guitar solo in Mr Blue Sky and to hear it in “harp” mode, try Mercury, Saturn or Neptune.
The Feather listens on MIDI channel 9 and is usually configured for some kind of tuned percussion – usually a xylophone or glockenspiel. This is also often used for any kind of “bell” type sound or in one case, as a celeste which you can hear quite well in Neptune from The Planets. A good one for the glock is the Liberty Bell.
Both of these have a high degree of polyphony which is very useful for the classical pieces.
You can find out the specific details of these projects here:
To go further with the VS1053, also take a look at Arduino MIDI VS1003 or VS1053 Synth.
MT32-Pi – MIDI Channel 8
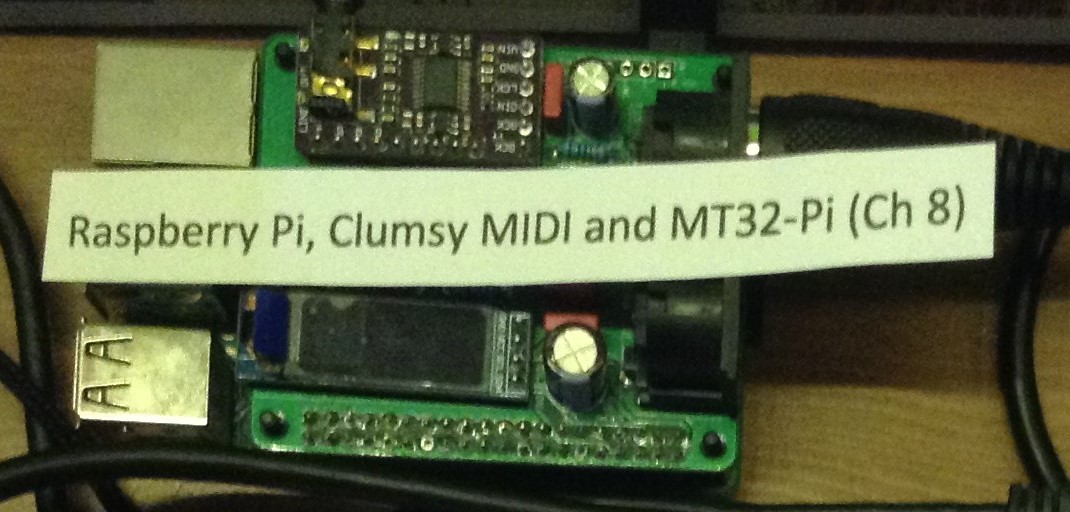
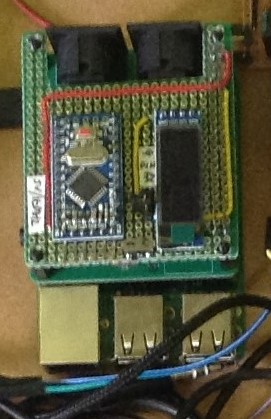
I’ve re-used my Raspberry Pi, Clumsy MIDI and MT32-Pi but I’ve removed the custom filter board from the previous build (shown on the right) and use a standard Clumsy MIDI interface and rely on the core MIDI splitter to do the routing.
You can hear this (on MIDI Channel 8) playing Timpani for example in several performances, most prominently in Jupiter, Uranus and Thunderbirds! I also used it for the voices in Neptune.
I tend to run my MT32-Pi in general synthesizer mode where it is running a Fluidsynth General MIDI soundfont.
Optional Extras!
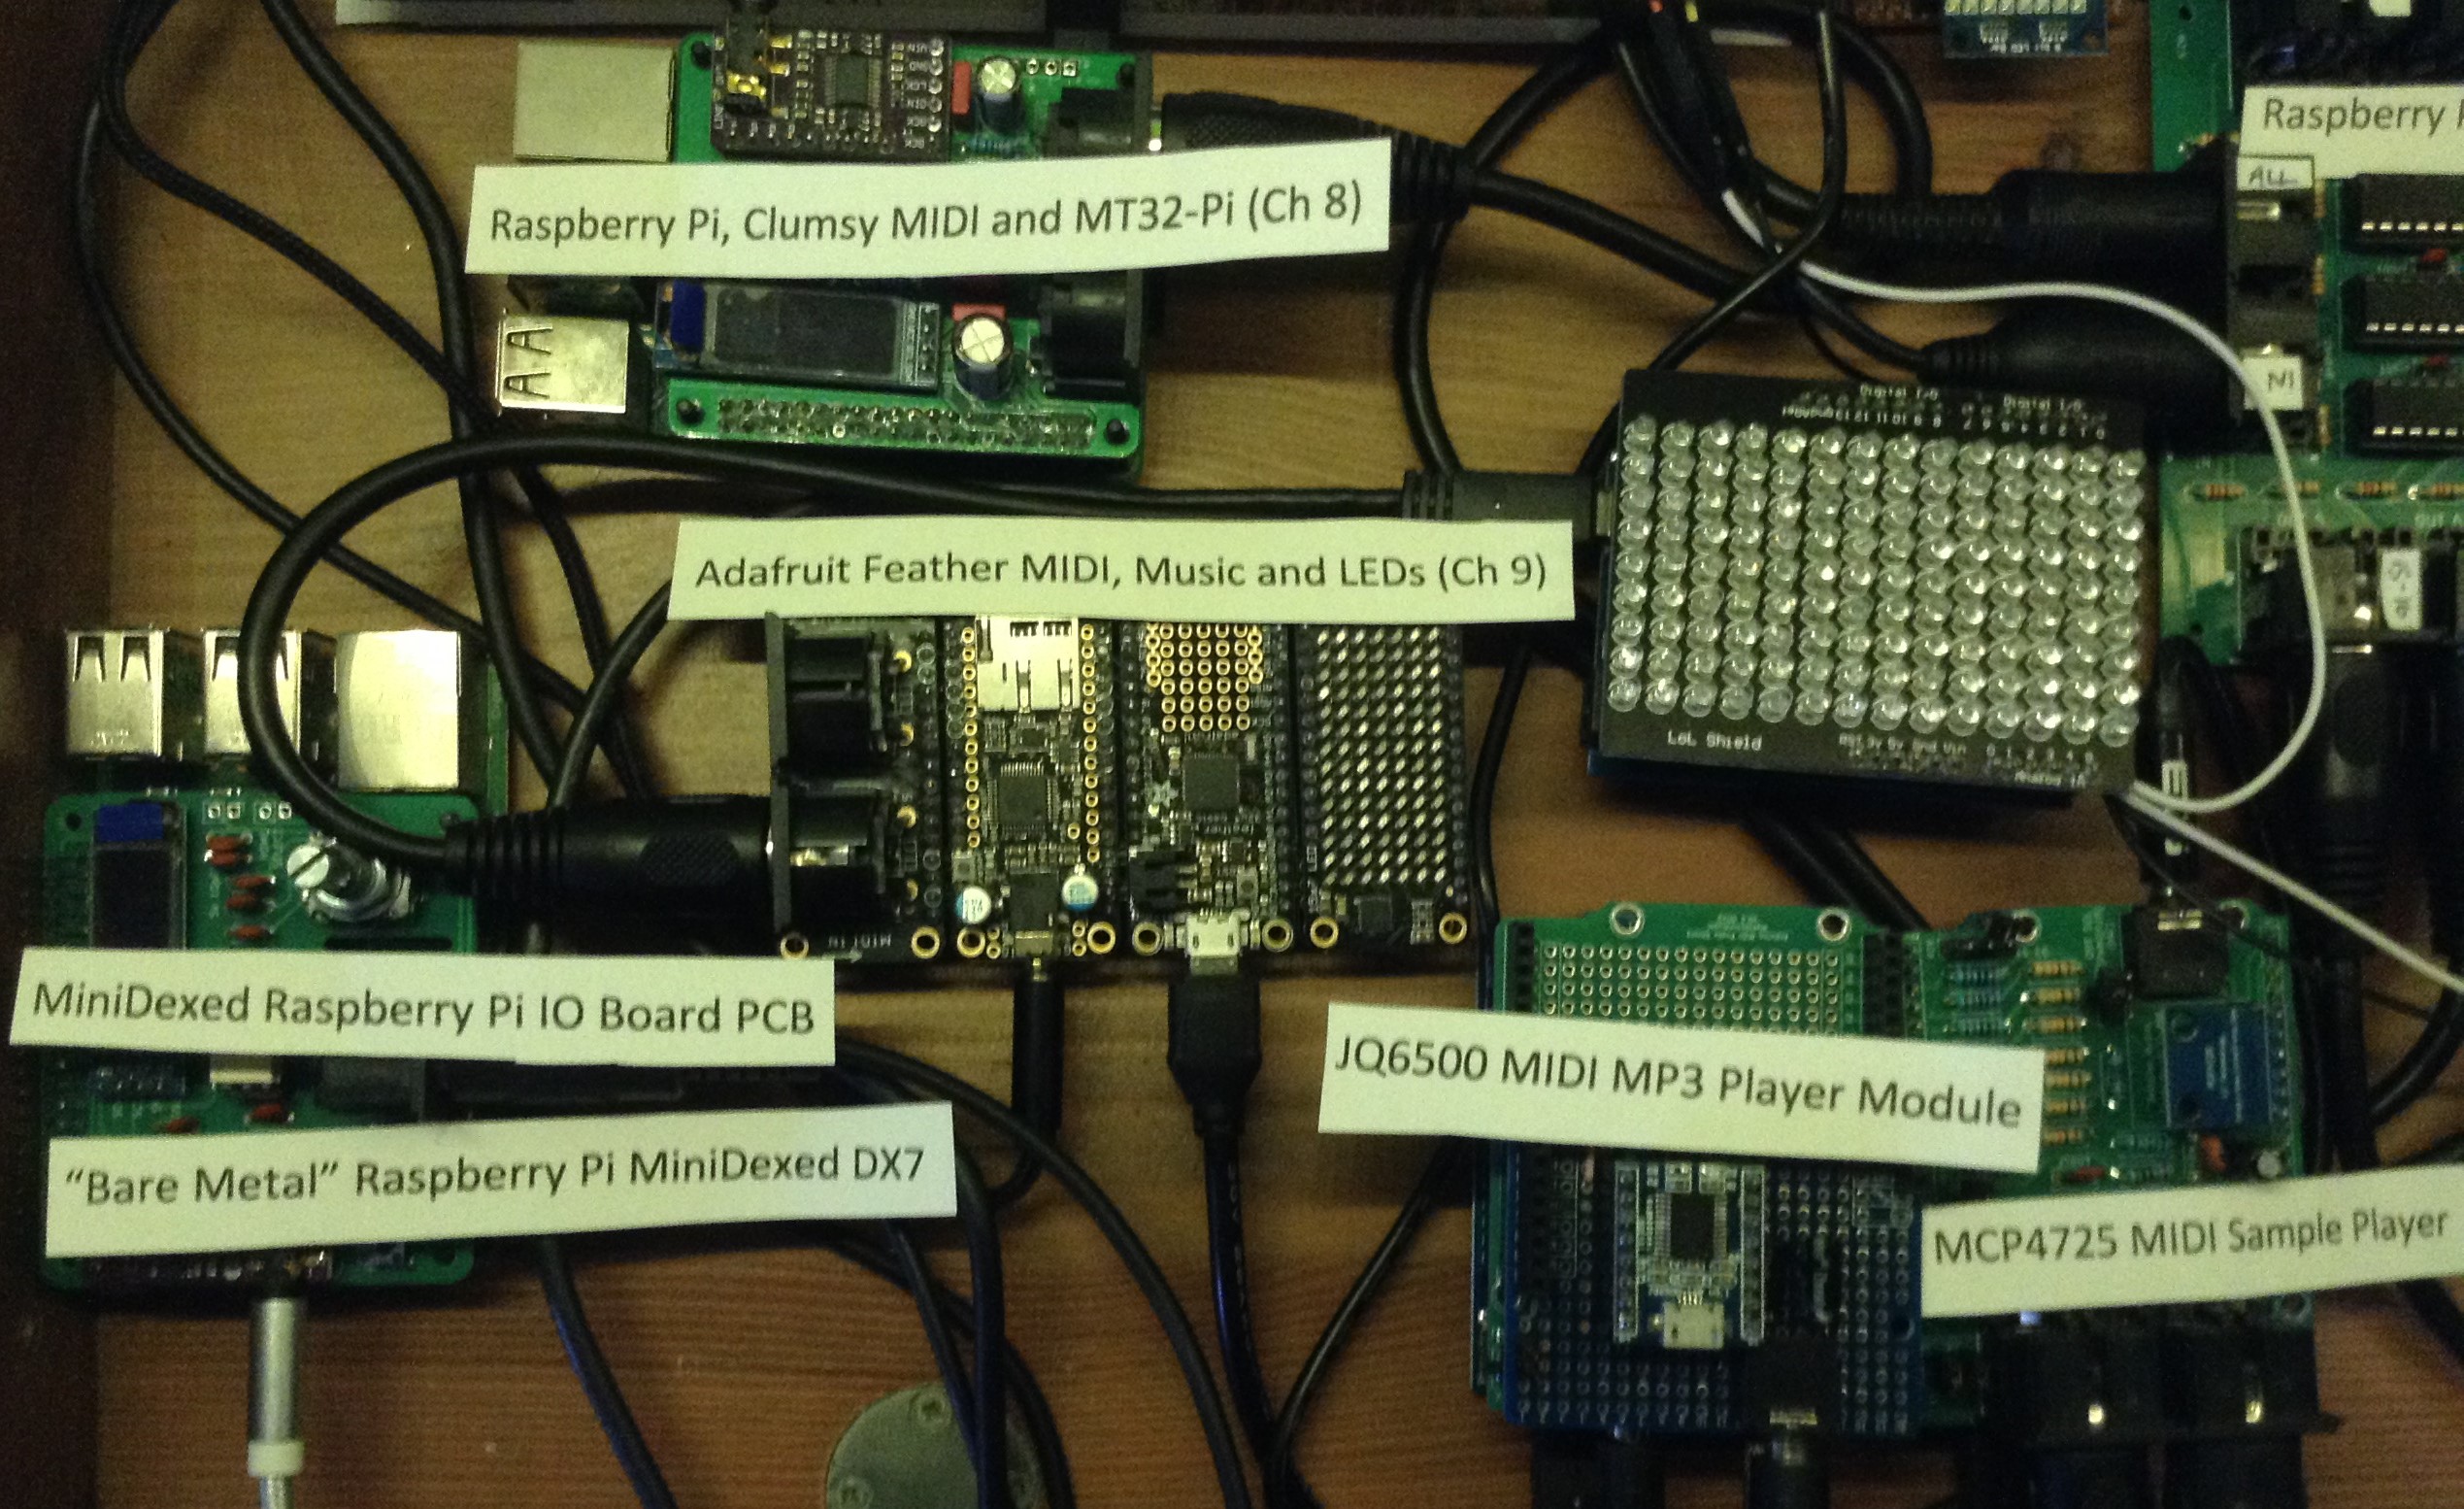
For the inaugural recording of Tchaikovsky’s 1812 overture, I’ve called in a few extras too. In the photo above you can see:
- JQ6500 MIDI MP3 Player Module – for clash cymbals.
- MCP4725 MIDI Sample Player – for the cannons.
- “Bare Metal” Raspberry Pi MiniDexed DX7 – for extra tubular bells for the carillon.
- LOLShield MIDI Lighting Effects – for “firework” effects.
These won’t normally be part of the main Lo-Fi Orchestra.
MIDI Routing and Monitors – All Channels

The main MIDI routing is handled by an instance of my Raspberry Pi Pico MIDI Splitter. This has a bespoke configuration for the Lo-Fi Orchestra configuration (as can be seen by the channel numbers on the labels on each port!).
It takes a single MIDI IN from a PC but as well as distributing across the orchestra, there is a “software MIDI THRU” back to the corresponding MIDI OUT port, which I’ve used to link up to the various MIDI visualisations I’m using.
I’ve kept the two I used previously (shown below), but now the MIDI feed goes into the TFT MIDI Display mounted on one of my Arduino MIDI Proto Shields with the RX signal duplicated (along with 5V and GND) to the MIDI channel monitor.
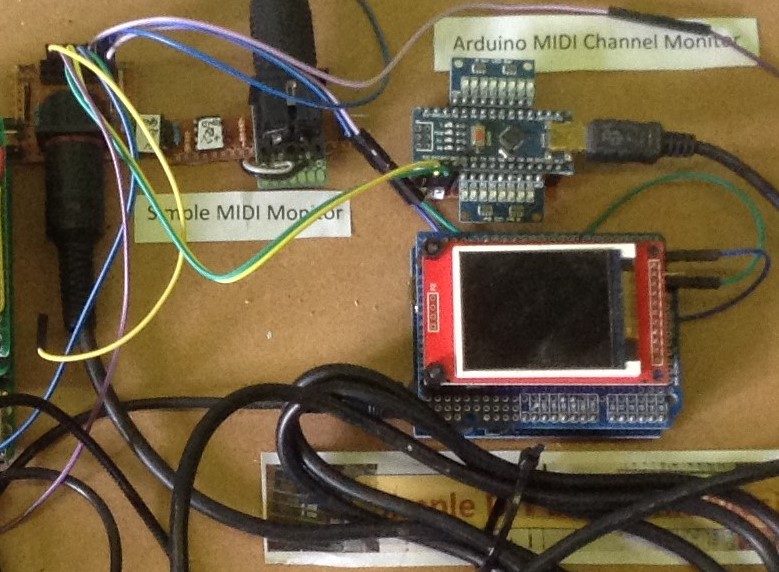
Some of the interesting ones to watch the visualisations to include Jupiter (especially the finale), the Sky Toccata (the runs in the flutes), and the Bolero (for the parallel, polytonal tunes).
The orchestra has the following attached:
If you want to get more into MIDI visualisations, then explore the MIDI monitor category on this site.
Routing MIDI and Audio
The set up for MIDI Routing is vastly simplified thanks to my use of the Raspberry Pi Pico MIDI Splitters. As already mentioned there is a core splitter used to distribute the main MIDI signal around the orchestra. Three of these OUTPUTs go to individual Raspberry Pi Pico MIDI Splitter (TTL)s that further distribute the messages across the multi-Nano boards using my new “note balancing” application.
My initial design is shown below. This got tweaked a little when it actually came to wiring things up.
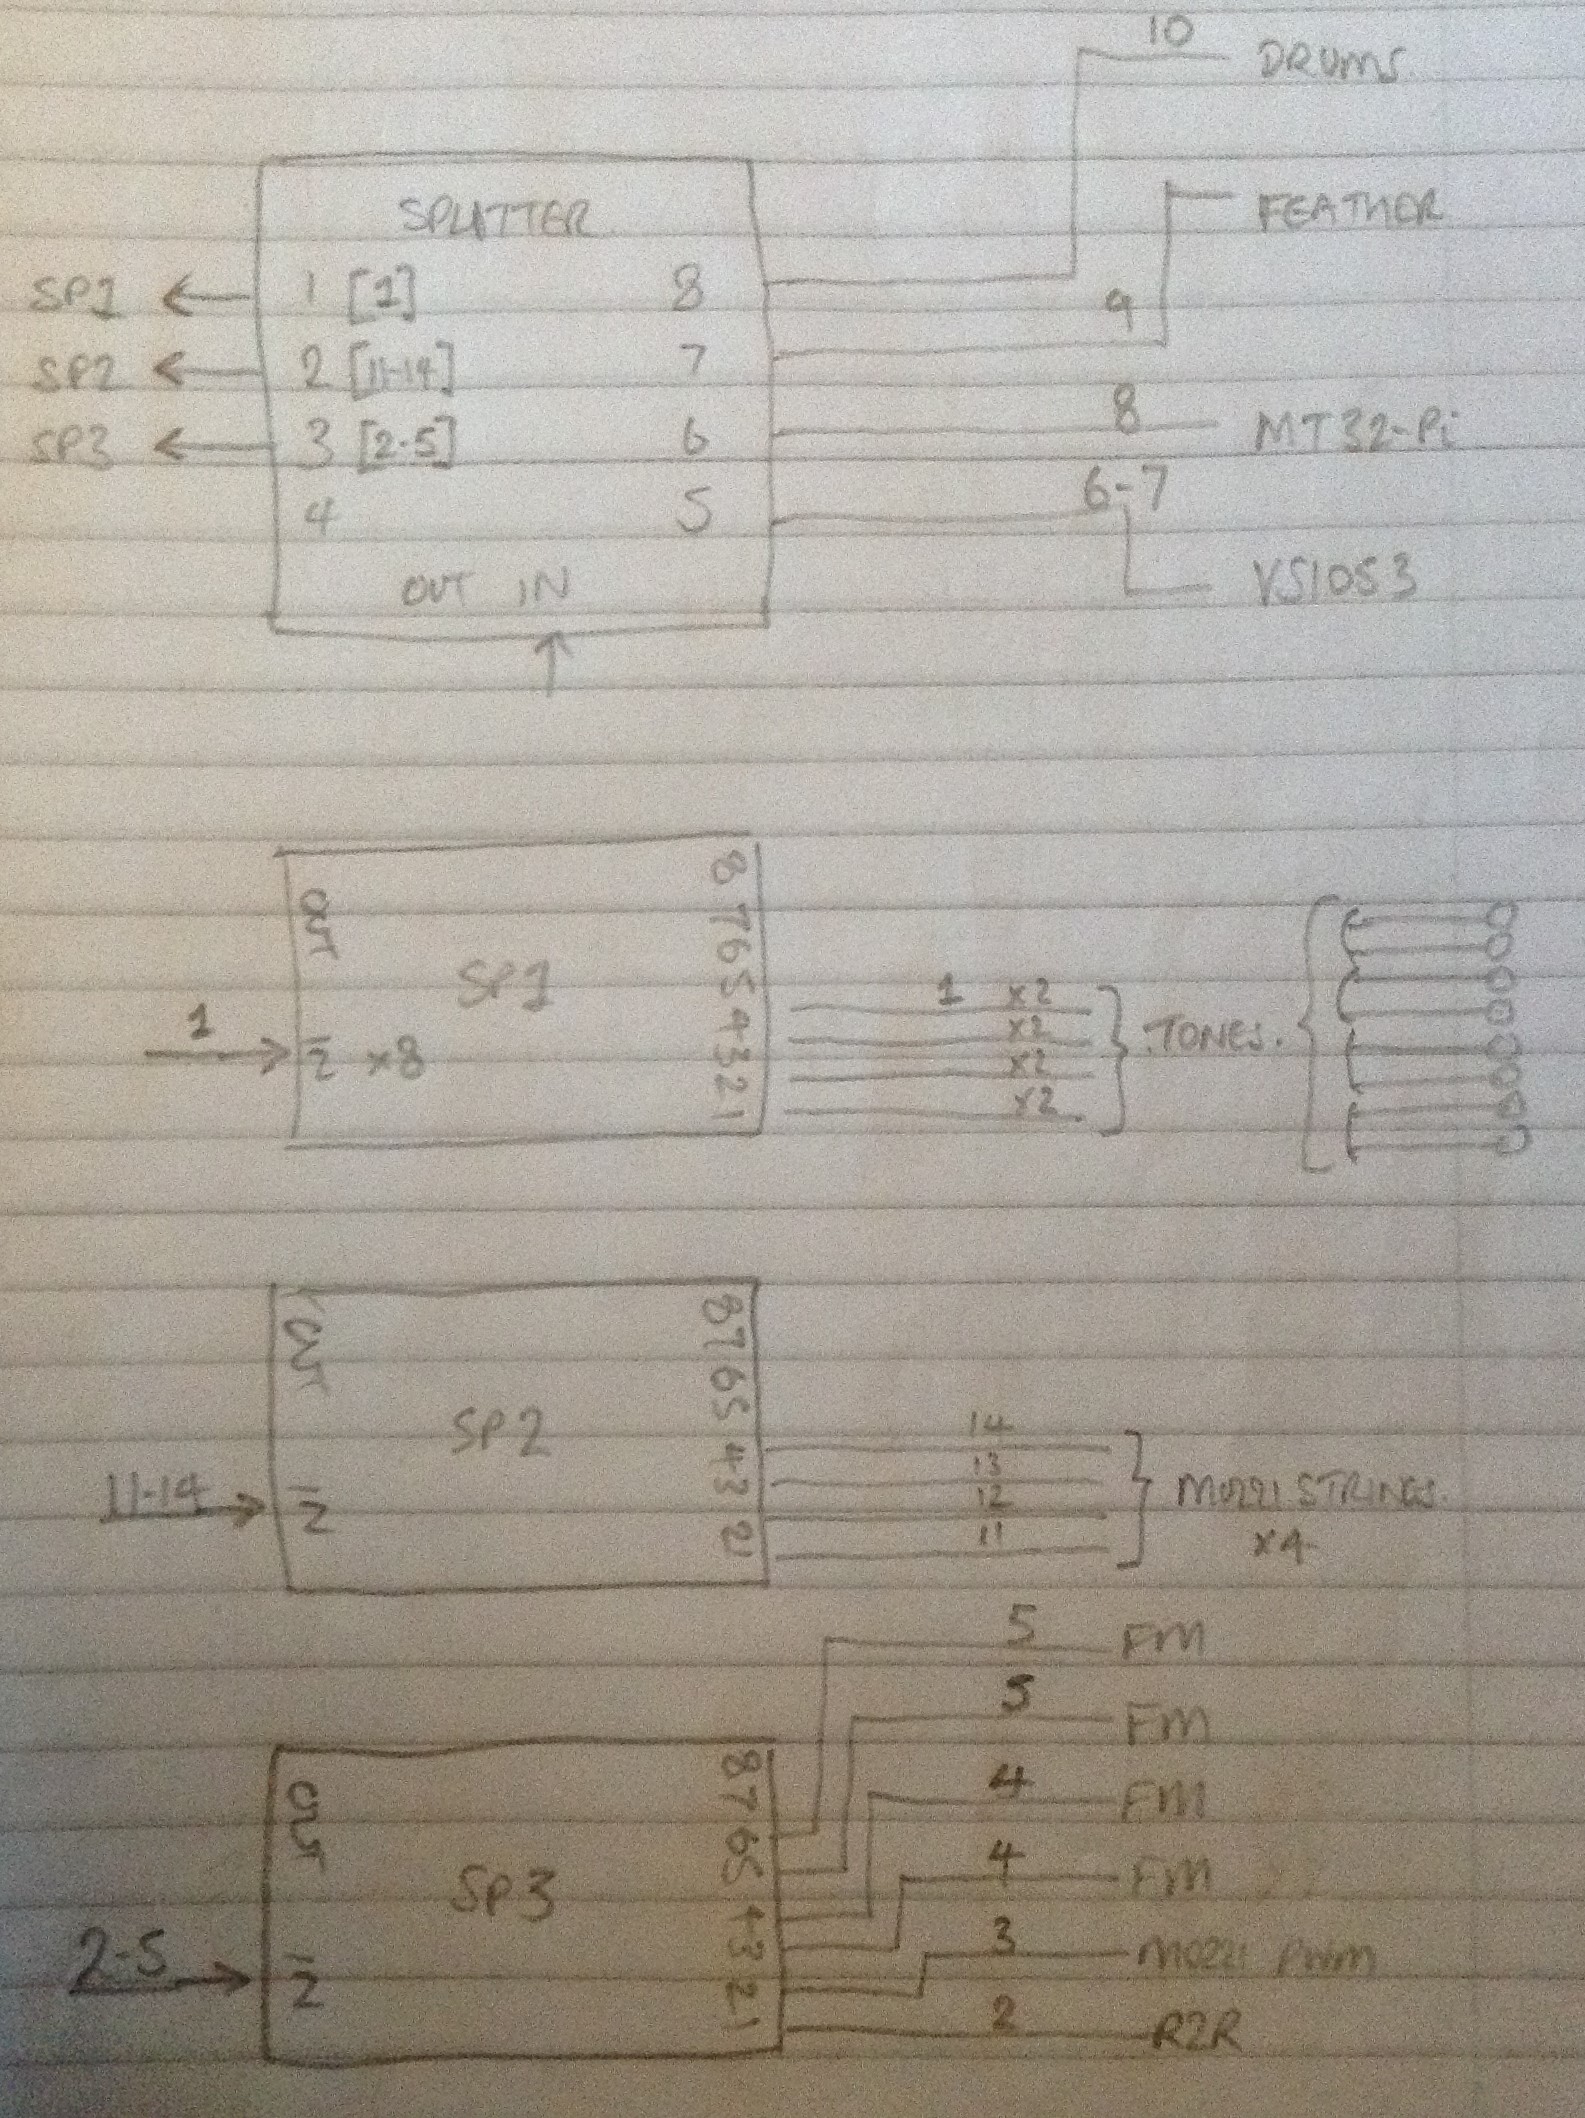
The final routing table design for the main Pico router is shown below. This is running the Raspberry Pi Pico Multi MIDI Router code but configured for 8 PIO TX ports and 0 PIO RX ports. Only the first hardware UART is connected of course too.
Each of the TTL splitters has their own configuration for the Raspberry Pi Pico MIDI Note Balancer code.

Audio is simpler too. Apart from the tones() with their own speakers, and the relays of course, everything else has a 3.5mm stereo audio jack output. I’ve added a third 4-port audio mixer, so I now have the capacity for 10 stereo audio inputs which I can now route directly into a computer for recording. This means a mic is only now required for the “acoustic” parts of the orchestra – the tones and relays. This should make for much better levels in the final recording.
In an ideal world, I’d have a multi-audio-channel link into some kind of digital audio workstation for some proper mixing. Instead, what you get is a “live” version where a single microphone hangs down over the speaker end of the orchestra and I do a simple balancing of the amplified signals and the self-produced signals for a single video take. It’s crude, it’s definitely Lo-Fi, but it’s simple.
Conclusion
The whole point of the Lo-Fi Orchestra is simply to show the various projects working in a way that is slightly more interesting than me sending them a few notes from a diy, converted keyboard. It was never designed for any kind of high quality musical output.
One thing I originally wanted was the idea that it might be possible for someone to build any of the individual projects on solderless breadboard or stripboard and still see how they could come together for something bigger. Hopefully this post shows that even though I’ve now replaced many of the original projects with custom PCBs, really they are just for my own convenience rather than particularly changing the results!
One thing I have found though, is that the orchestra is a lot more predictable now! It seems much more reliable and a lot less electrically noisy. It also shows up a lot more of the faults in some of my original MIDI files which has been entertaining for me as part of the build and debugging process!
In summary, I think there is a lot more potential now for some kind of “Lo-Fi Orchestra jukebox” playing device controlling the whole thing more “on demand”. There will always be exceptions – not everything will call for cannons or fading voices, but for anything with a (now largely) standard set up, I don’t see why I could have a Raspberry Pi (for example) with a menu of options to play.
In short, I’m really pleased with the results and it seems well worth the effort! There are a few photos of the rebuild in progress at the end.
Kevin
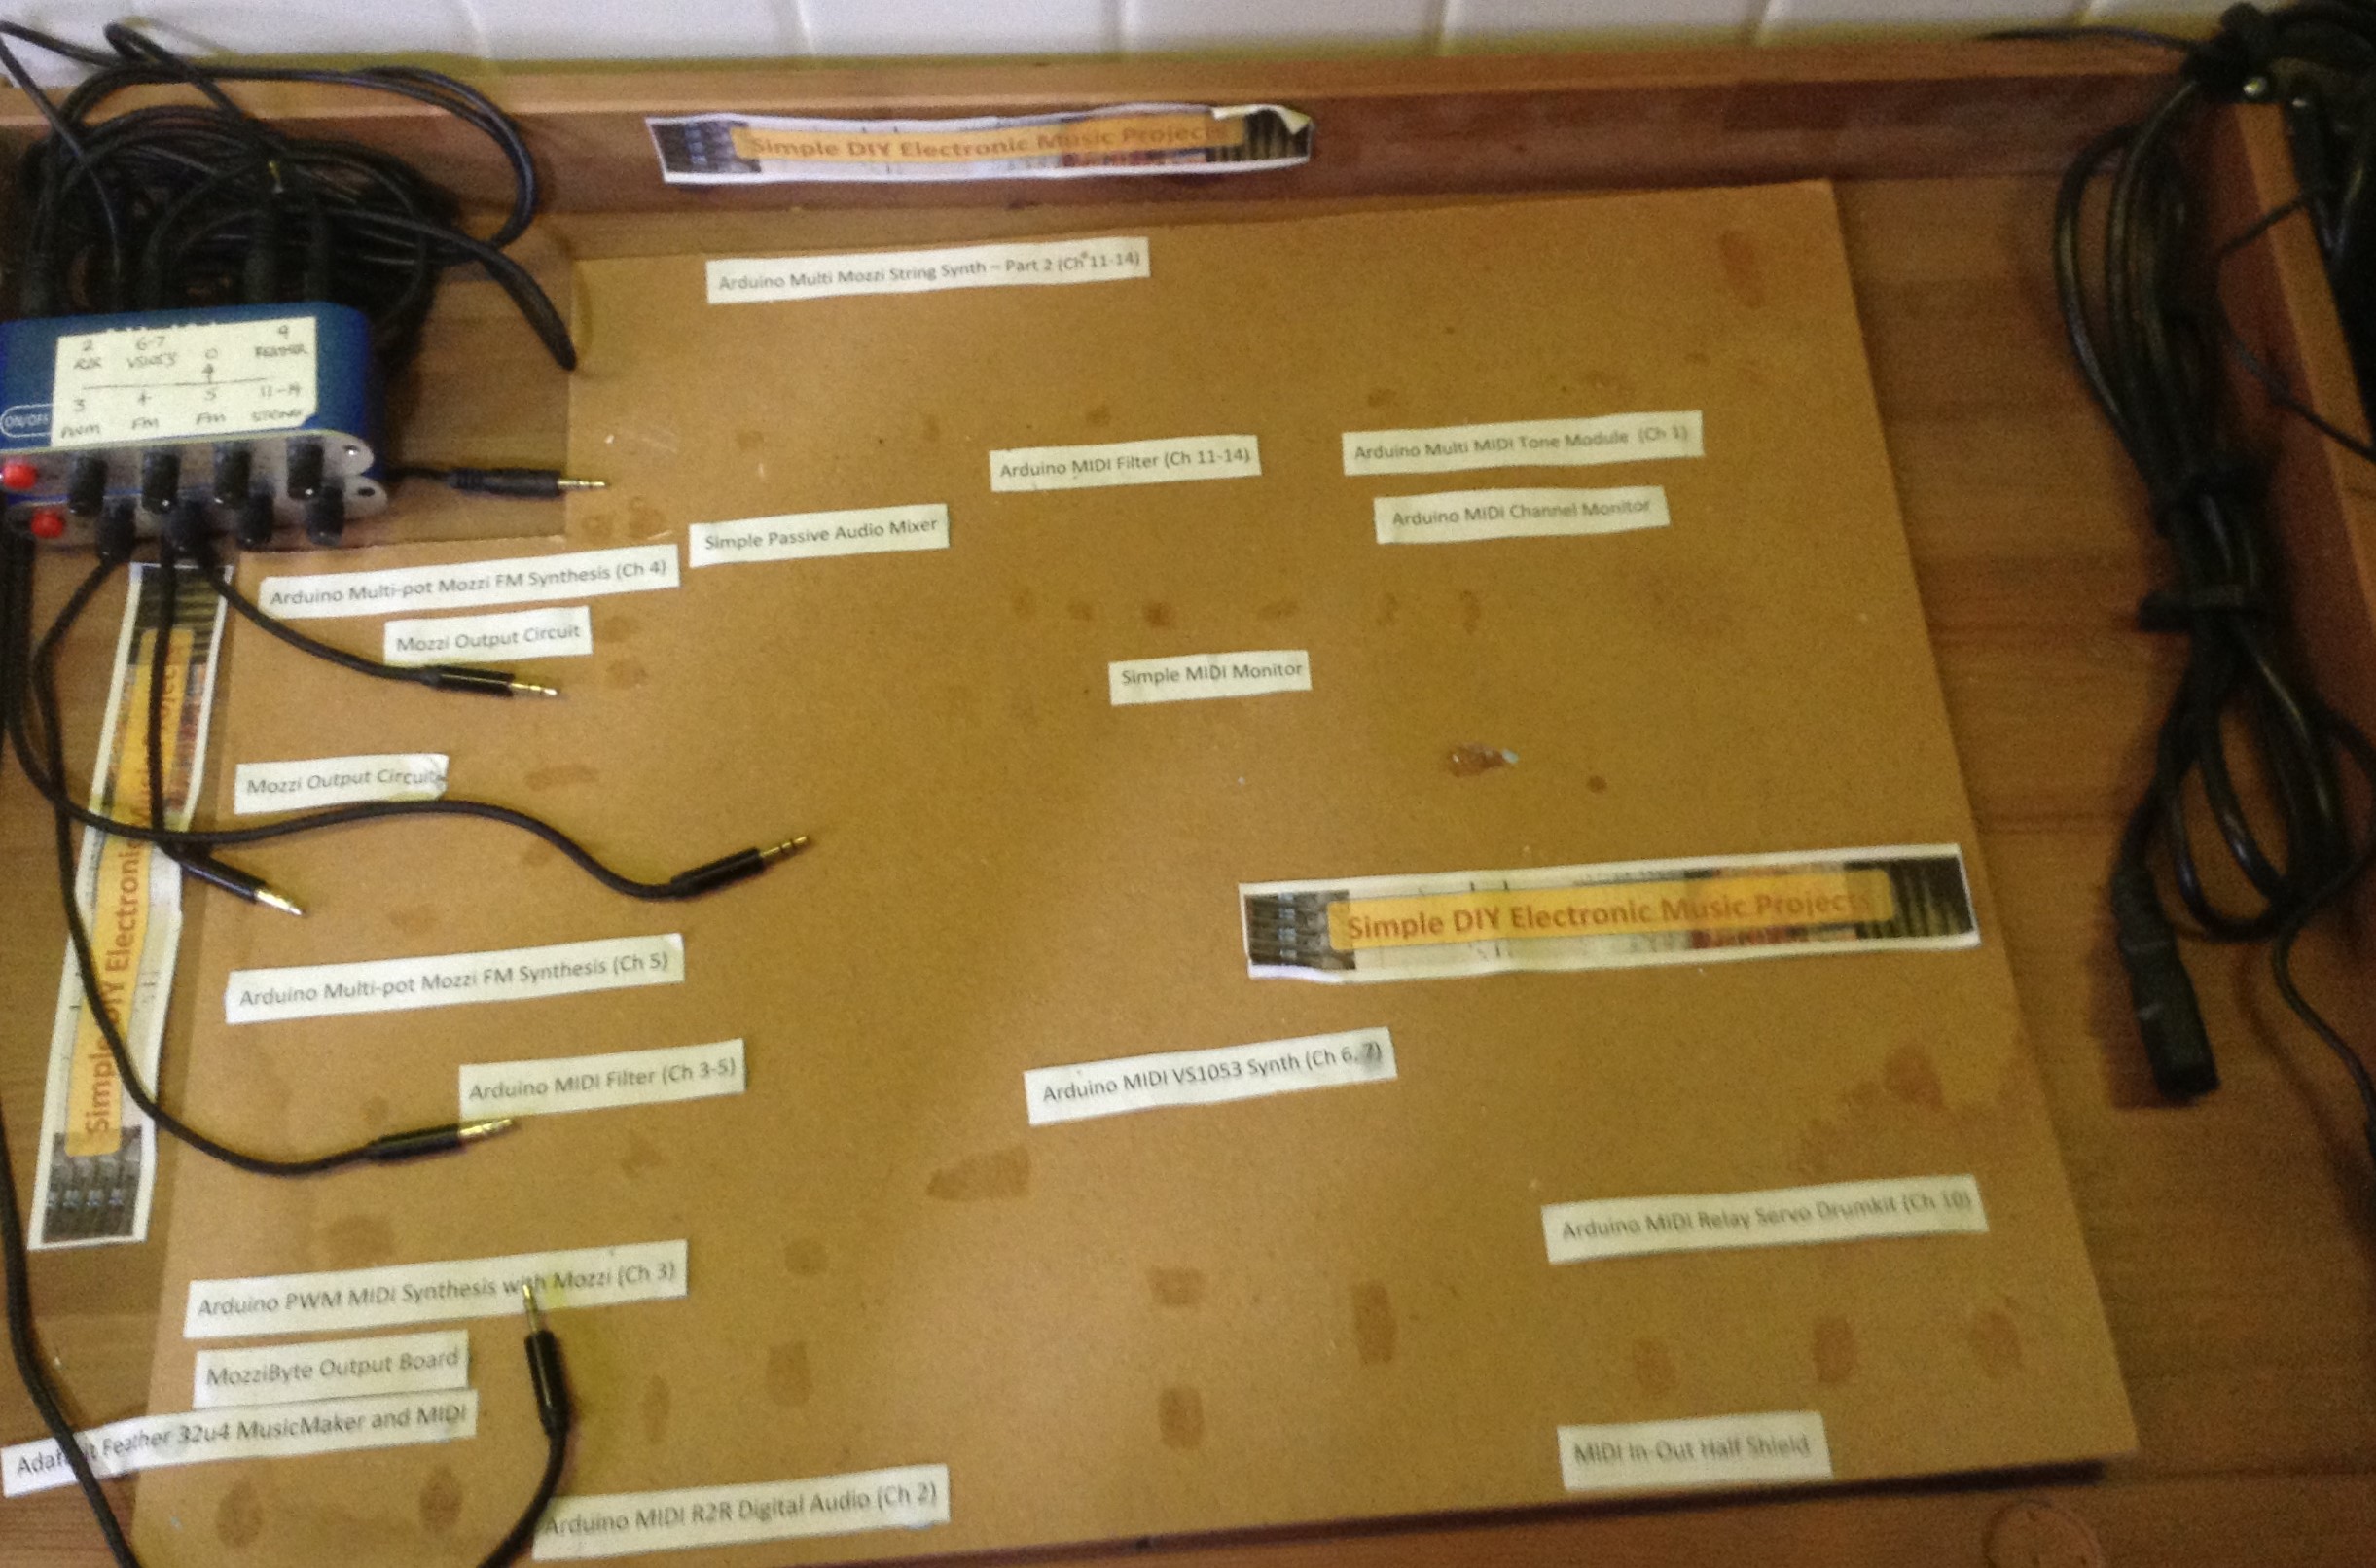
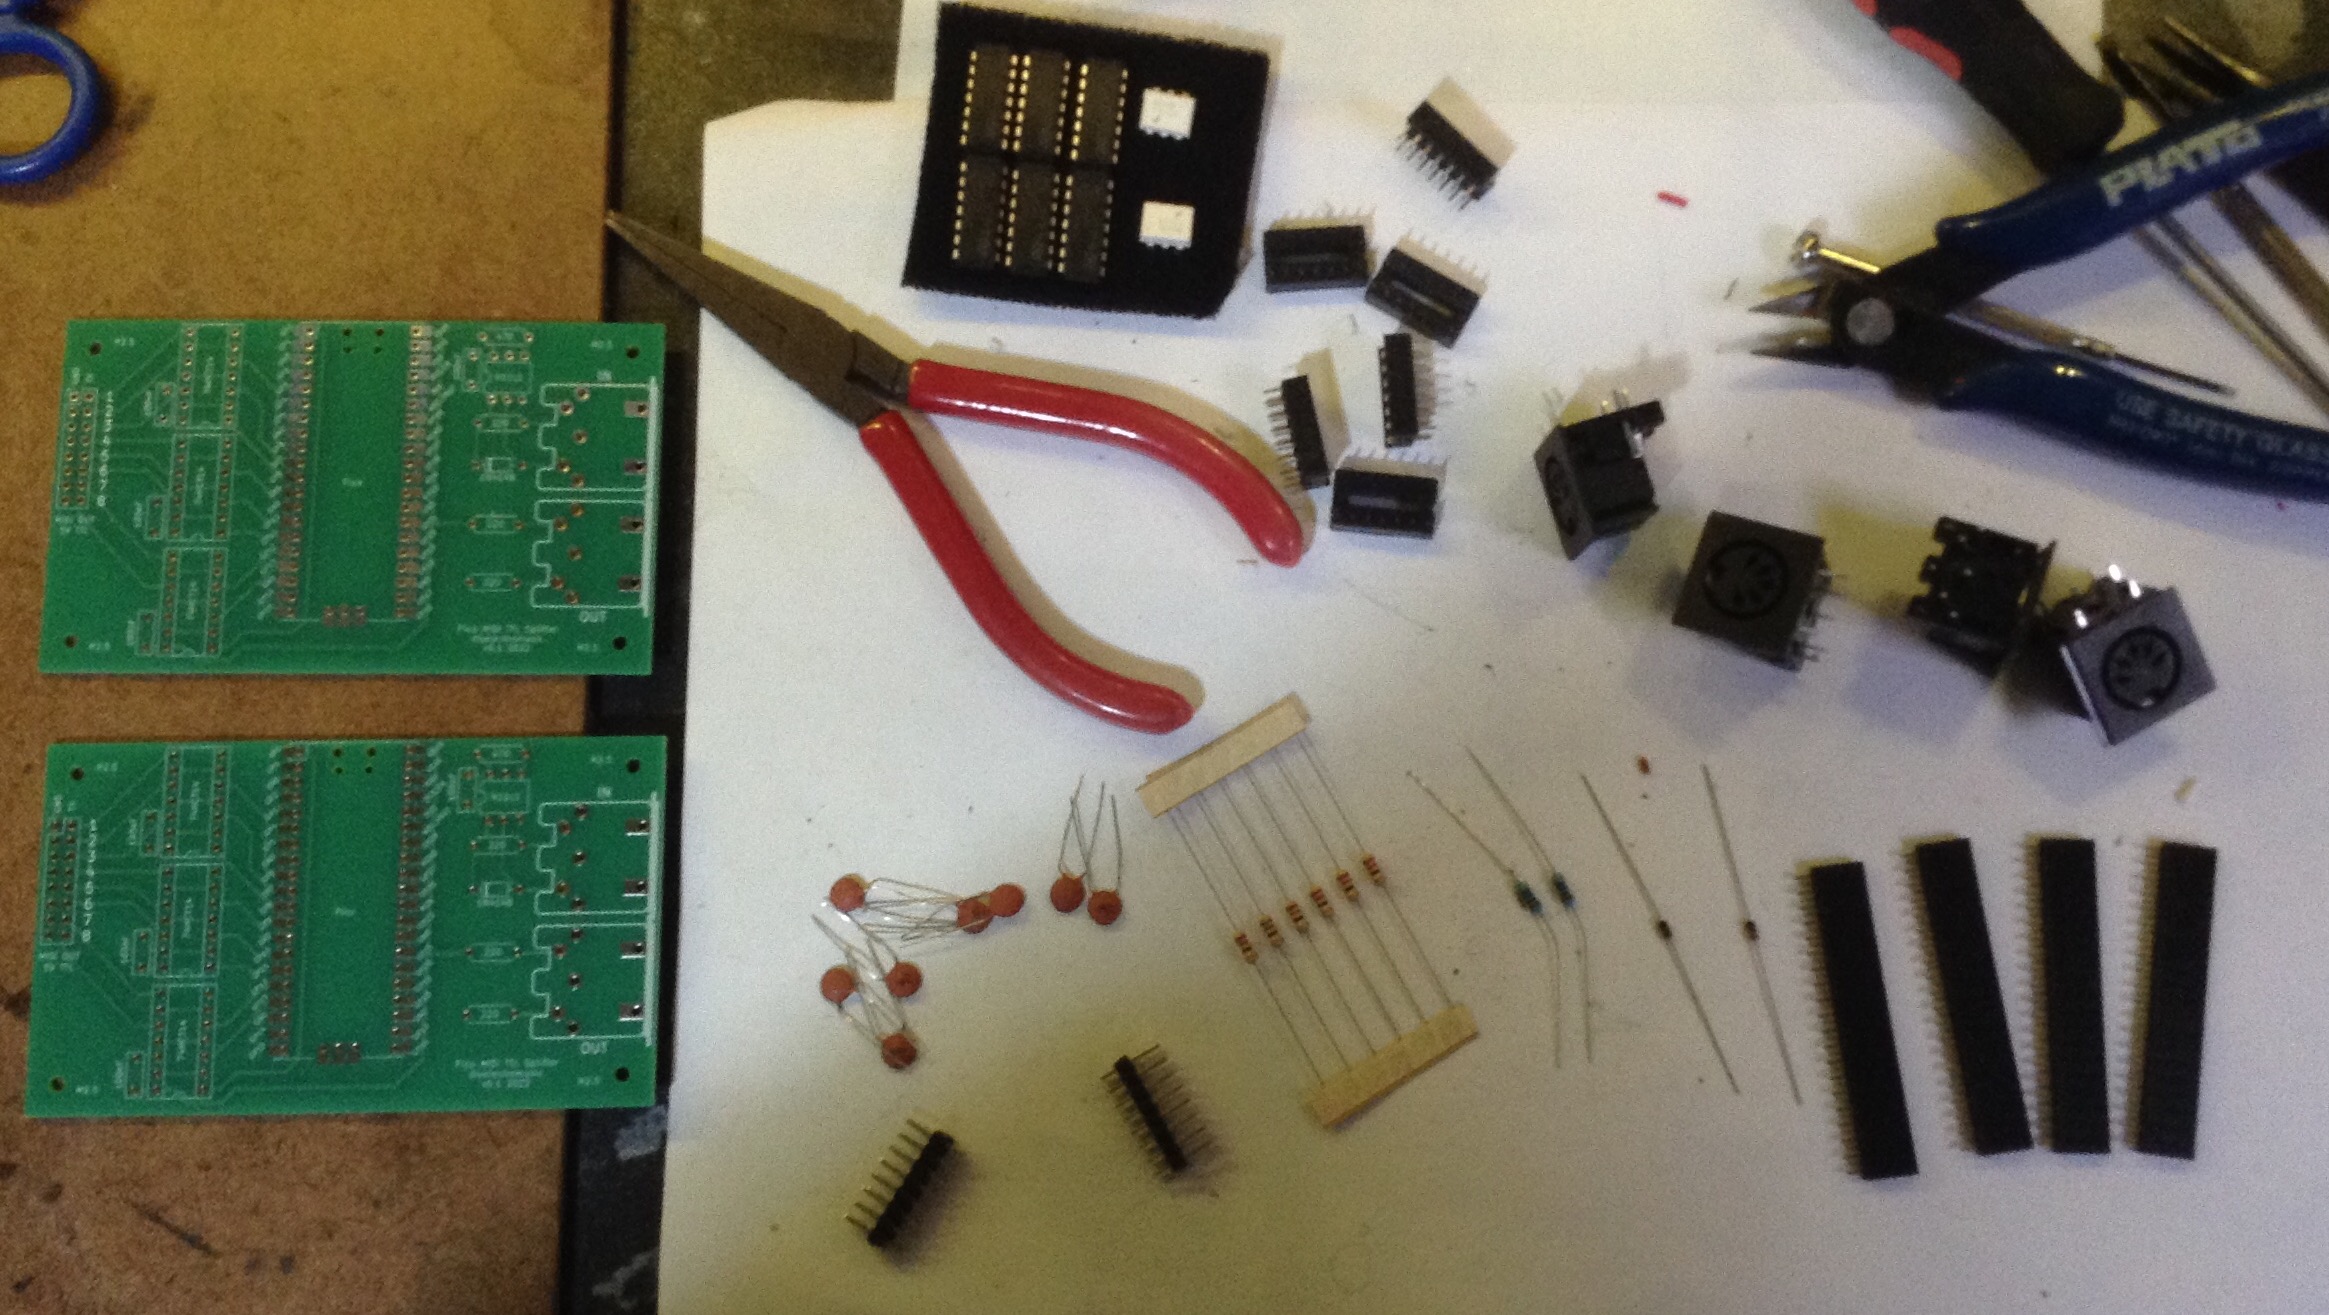
The Rebuild In Progress