If you’re a regular reader of this blog, you’ll have noticed my trusty Roland MT-32 MIDI sound module in various experiments. It even featured in my “Raspberry Pi Plays Bach” video which was my first play with MIDI on the Raspberry Pi Pico.
I’ve been wanting to experiment with some of options for using a full Raspberry Pi with audio for a while, as there are lots of projects out there working on synthesis. One I’ve been particularly keen to have a go with was the MT32-Pi project, which provides MT-32 emulation, so I’ve chosen that for the subject of my first full Raspberry Pi based project.
- In a follow-up post I look at the General MIDI capabilities of the MT32-Pi.
- In a further set of posts, I look at MIDI controllers for an MT-32.
Warning! I strongly recommend using old or second hand equipment for your experiments. I am not responsible for any damage to expensive instruments!
If you are new to the Raspberry Pi, here are some resources to get you started.
- Getting Started with the Raspberry Pi Article
- Getting Started with the Raspberry Pi Tutorial
- Adafruit Raspberry Pi Lessons
Other links to resources from this project.
Parts list
- Raspberry Pi model 3 or 4.
- Power supply.
- Micro SD card.
- MT32-Pi supported sound board (optional) – I built myself a Clumsy MIDI interface (see below).
- MIDI source device and appropriate leads.
The Hardware
I’m documenting my own build, which I plan to use further down the line too. I opted to build a Clumsy MIDI interface for the Raspberry Pi. This is an open design that provides:
- Bi-directional MIDI interface.
- I2S audio DAC output.
- Small OLED display.
You can’t buy a kit for these, but they do provide instructions for how to get a PCB produced. Then you need to get hold of the components yourself and build it. Here are the relevant links.
Once all the parts were obtained and the PCB arrived, building the thing was actually quite straight forward. I had an audio board with no jumpers pre-configured, so I had to follow the instructions on the assembly page to set it up correctly. Apart from that, everything else was fine.
I had a Raspberry Pi version 3 kicking around, and in fact they recommend using a v3 board over the new v4 as they are cheaper, boot more quickly and don’t get as hot when running!

Configuration and Use
I followed the basic instructions on the MT32-Pi project site:
- Downloaded the latest release image and copied the contents over to my SD card.
- Edited the mt32-pi.cfg file for my Clumsy MIDI interface (more below).
- Sourced the ROM images for installation in the “roms” directory.
- Assembled the board, MIDI link and audio output.
- Turned it on and started playing it from my PC!
Like many emulation systems it requires the original “read only memory” (ROM) images from the chips inside an actual unit, but the project cannot list how to get them or supply them for copyright reasons. Searching for MT-32 roms should see you right. The actual emulation is provided by the Munt project, but that detail is all hidden away in general. But it does mean that if you find yourself with a choice, you need a set of ROMs that will work with Munt.
Clumsy MIDI Configuration
Details of how to set up MT32-Pi for the Clumsy MIDI can be found here. There are three things to change:
- Turn off MIDI USB (if you don’t plan to use a USB MIDI device).
- Turn on I2S audio.
- Turn on the ssd1306 display.
One other change I had to make – the MT-32 always powers up listening on MIDI channels 2 onwards and needs a button-combination to change it to channel 1. Thankfully with MT32-Pi this is a configuration setting, so I also changed:
midi_channels = alternate
Testing with MIDI-Ox
There is no user interface by default on the device (something I might look into as a future project) so to test it I fired up MIDIOX and my PC USB MIDI interface. I have a Roland UM-ONE which is really great, but I also have a cheap “from an auction site” PC MIDI interface. If you are thinking of getting one of those, have a read here – you might get lucky, I did, or you might not.
The MT32 is a pre-General MIDI device, so the instrument mappings are not the same as for General MIDI synths. MIDI-Ox has the concept of “instrument files” which can be customised as required. The MT-32 accepts MIDI program change messages and the full instrument list can be reached using one of the 127 data values in the message.
To make testing easier I created a MIDI Ox “INS” file containing the MT-32 instrument definitions. This can be loaded from the “instrument panel” and used to select the different voices on the MT-32. You will have to either copy the INS file into your MIDI Ox installation directory or change the “Instrument Definitions Folder” from within the Instrument Panel in MIDI Ox.
MT-32 and MuseScore3
I do all my MIDI programming using musical notation, so I use MuseScore quite a lot. But like almost any modern musical workstation (DAW or notation) when it comes to MIDI it assumes several things:
- A full General MIDI instrument bank.
- Multi-channel instruments (e.g. “violin” would be several instruments: bowed, pizzicato, tremolo, string section; trumpet would be open and muted; and so on).
- Complex expression control – for example using MIDI continuous controllers for afternote expression.
None of this really works with the MT-32 and synths of that era! There are a number of ways to cope with this:
- Use instrument “translation” so that when a General MIDI “flute” program change message, for example is sent, it gets translated to the program change for the flute sound on the MT-32.
- Use MIDI filtering software or hardware to remove the additional timing, control, and expression messages.
- Reprogram the MT-32 to be “sort of” General MIDI compatible.
- Tailor your MIDI sender to the MT-32’s own configuration.
I’ve experimented with a few of these approaches, but ultimately any kind of translation method will still end up fighting with the limitations of a pre-General MIDI era device. So I went with the last option and created a set of MuseScore instruments that represent the MT-32 voices allowing me full control from within MuseScore itself over which instrument to use where.
MuseScore instruments are defined in a single XML file usually found in
<MuseScore installation directory>\Instruments\Instruments.xml
There are details of the format of the file here on the MuseScore site but the general idea is that instruments are arranged in groups (or families or genres) and have everything you need to know about that instrument defined – names, short names, range of notes, key, alternative voicings (confusingly called “channels” in the file) and most importantly for our purposes MIDI program change number to use. So in theory it is just a case of edit the file as required to add in your new instruments.
There are a few considerations though when creating voices for the MT-32:
- It supports instrument groups, families and genres. I’ve created MT-32 specific groups, and a single “mt32” genre and didn’t bother with families.
- It doesn’t cope well with multiple voicings, so only include one “channel” in each instrument definition.
- In order to not overlap with the standard instruments, I prepended “mt32” to the various XML ids used.
- There are a huge number of instruments in the standard MuseScore instrument file, I just left it to a much smaller range of representative MT-32 voices.
- There are lots of options for keys, score settings (staves, tab, notation hints, etc), articulations, expressions, etc possible for instruments. I ignored most of them for the MT-32.
- MuseScore has the concept of a second instrument file, so I can create my MT-32 additional instrument set and add it to my installation without affecting the originals.
Here is a sample instrument section from the file, this is the MT-32 flute, based on the original MuseScore Flute.
<Instrument id="mt32-flute">
  <longName>Flute (MT32)</longName>
  <shortName>Fl.</shortName>
  <description>Standard Concert Flute</description>
  <musicXMLid>wind.flutes.flute</musicXMLid>
  <clef>G</clef>
  <barlineSpan>1</barlineSpan>
  <aPitchRange>60-93</aPitchRange>
  <pPitchRange>59-98</pPitchRange>
  <Channel>
    <program value="72"/> <!--MT32 Flute-->
  </Channel>
  <genre>mt32</genre>
</Instrument>
To install in MuseScore, follow these steps:
- Download the MT-32 instrument file from my GitHub (link below).
- Open “preferences” (Edit->Preferences) and go to the “Score” tab.
- There are two entries for instrument files, go to the second one and use the “open” icon (far right) to navigate to and open your new instrument definition file.
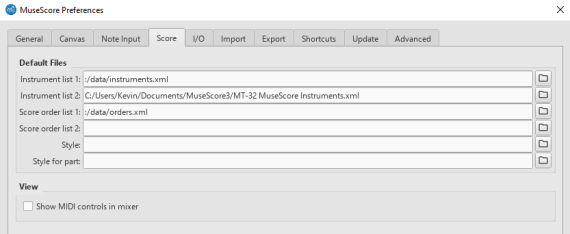
Now when choosing instruments you should be able to choose “MT-32” as a genre and choose the MT-32 instruments. If you have an existing score, you can do this by double clicking on the instrument name for each stave. If you are adding new instruments you should now have them as an option when using the Instruments view.

The mixing console (F10) can be used to assign (or adjust) which MIDI channels are used for which instruments. Things to remember here:
- The MT-32 is only listening on 8 channels plus drums. By default it expects channels 2-9, but I’ve switched modes with my module for channels 1-8.
- The MT-32 isn’t multi-timbral on a single channel (as far as I know), so only use the same voices on each channel.
As an example, I re-voiced my Lo-Fi Orchestra – War of the Worlds for the MT-32 and played it from my PC using “MidiBar”. You can see the results in the video. There are some limitations however.
First of all, if I get MidiBar to send it straight out over MIDI, then I get MIDI errors – hanging notes, missed notes, weird voicings, etc. This could be due to my cheap MIDI PC lead (see the notes above), or it could be the MT32-Pi struggling to keep up. I didn’t want to pull my Roland UM-ONE out of my Lo-Fi Orchestra to try that, but found that routing the MIDI file through MIDIOx works fine. So my “playing” set up is as follows:
- MuseScore3 with MT-32 voicings -> Saves to a MIDI file.
- LoopMIDI is started to create a virtual “MIDI router” on the PC.
- MIDIOx is started with LoopMIDI as the input and my cheap MIDI USB lead (USB2MIDI) as the output.
- MIDIBar is started and opens the MIDI file to play to into LoopMIDI.
The nice thing about this setup is that you can turn on MIDI logging and see what information is being sent across. By enabling the MIDI filter and only logging program change messages, I can see the initialisation of all the channels when I start playing the MIDI file.

MIDI Ox is decoding these using the General MIDI instrument list – I haven’t really orchestrated it for Choir Aahs, Lead3, Piccolo and ocarina… For the MT-32, it is using flute (72), clarinet (82), violin (52), sax (79), trumpet (88), trombone (90), electric guitar (61) and bass guitar (66), which are loosely my Lo-Fi Orchestra sections.
I haven’t done much by way of tailoring the MIDI programming itself, other than reassigning the voices. This means there are times (you can hear it in the video) where the MT-32 just can’t cope with the number of simultaneous voices, so some are cut off and the balance really could do with some work.
I’ve uploaded my MIDI Ox INS file and MuseScore Instrument file to GitHub here.
Closing Thoughts
I am so impressed with how straight forward this was to use (for someone a bit techy in the first place). This is a great little device and already I’m seeing lots of potential.
We can already hear some of the limitations, but to be fair to the MT32-Pi, I believe these are mostly limitations of the original MT-32 unit itself, not the emulation.
But MT32-Pi has options for additional sound fonts, full GM compatibility, and simple button control, and I’m now thinking of how I can combine it with my Arduino MIDI 7 Segment Controller and some of the other controller modules to build a fully-fledged MIDI sound module.
The original MT-32 also has options for editing the sounds that I’ve never played with, so now I’m starting to think about how I might have a look at that too.
If I added up the costs for all the components, I suppose this isn’t a particularly cheap option, but then it isn’t an expensive option either, and once you have a Raspberry Pi, you can do quite a lot more with them too. The biggest barrier to entry for me was having to order the PCBs for the Clumsy MIDI interface, but there are many options there too. But now I have five PCBs… and I’ve already built two of them…
Kevin

2 thoughts on “Raspberry Pi, Clumsy MIDI and MT32-Pi”