This project uses a cheap 1.8″ colour 128×160 TFT display based on a ST7735 driver chip which is available very cheaply in the usual places. The display links up to an Arduino using the SPI bus as described here and there is a nice little library to talk to it provided by Adafruit for use with their own module.
- In Part 2 I create a graphical visualisation of the notes being played.
Warning! I strongly recommend using an old or second hand keyboard for your MIDI experiments. I am not responsible for any damage to expensive instruments!
These are the key Arduino tutorials for the main concepts used in this project:
If you are new to Arduino, see the Getting Started pages.
Parts list
- Arduino Uno
- ST7735 based 1.8″ display (for example, this one from Adafruit)
- MIDI In Interface (see: Arduino MIDI Interfaces)
- Breadboard and jumper wires
- Optional: Stripboard, jumper wires and headers
The Circuit
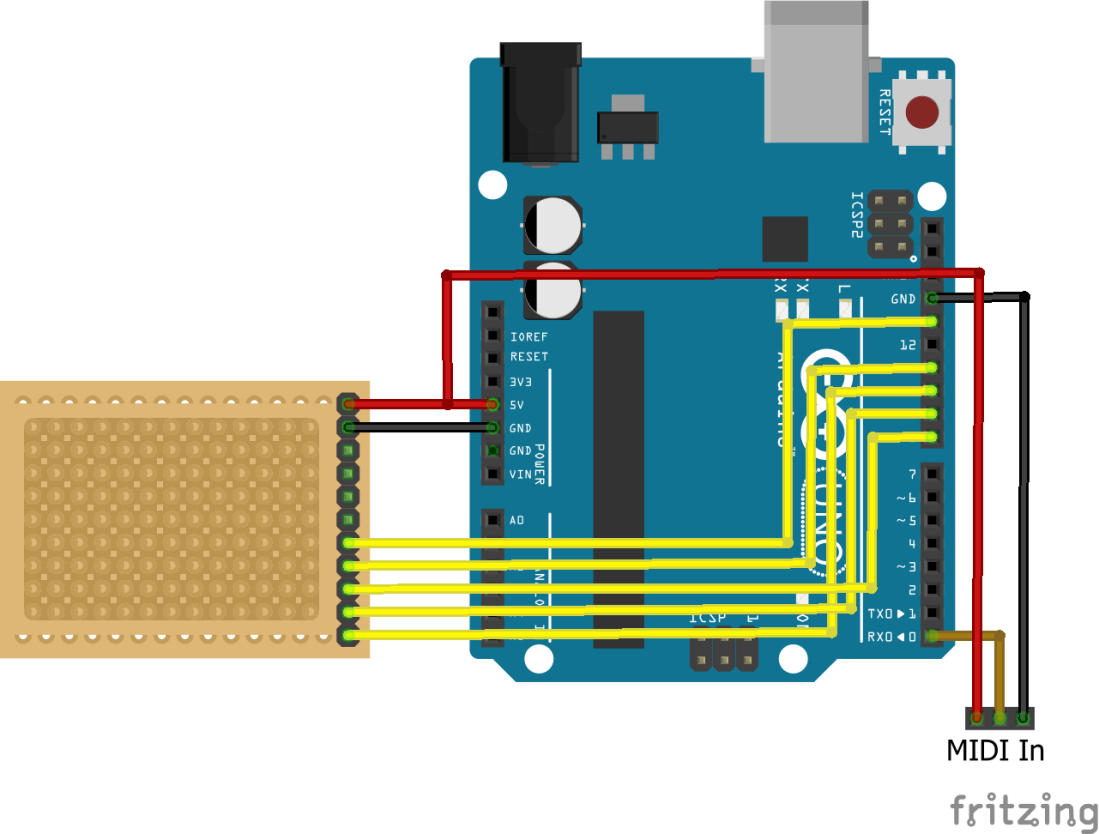
I don’t have a Fritzing part for my cheap display, so I’ve just approximated it using stripboard in the above diagram. My board looks like the following (which is the same one as used in this blog post):


Note that the pin-out is different to the Adafruit module – check your own module and link it up accordingly.
One of the nice things about this cheap module is that it can be wired up to support the hardware SPI pins on the Arduino (as shown above) or to use software SPI, which is slower but might allow you to plug the display straight into a cheap Arduino as shown below:
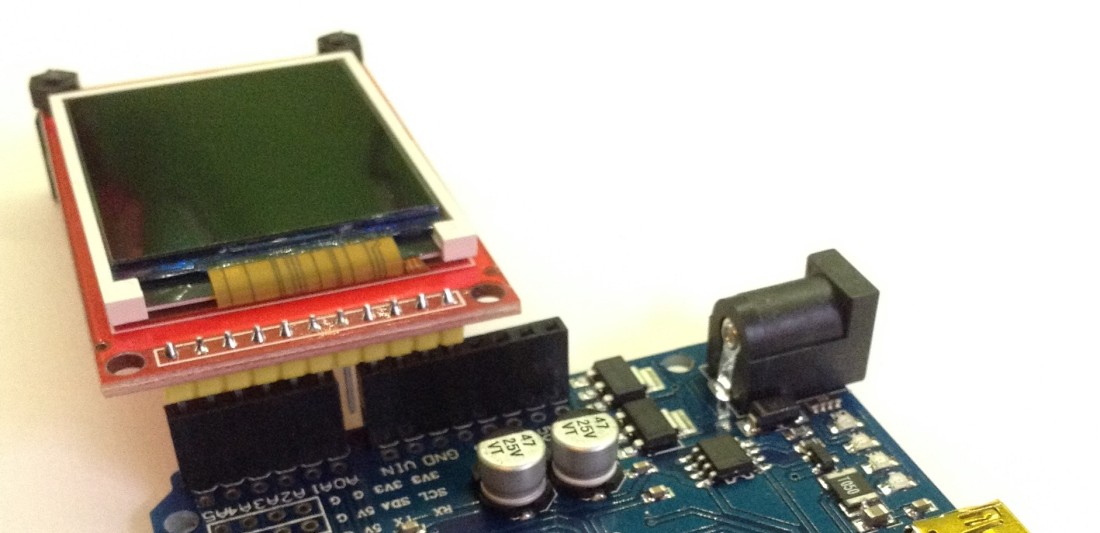
You can’t plug it into an official Arduino as there isn’t a gap in the headers in an appropriate place!
I patched it into the hardware SPI pins as shown in the circuit diagram using the following connections:
- VCC – 5V
- GND – GND
- CLK – 13 (SCLK)
- SDA – 11 (MOSI)
- RS – 8 (D8)
- RST – 9 (D9)
- CS – 10 (D10)
Here it is patched in and working:
For the video, I built the “diy” shield described in this blog post, but added two jumpers to allow me to connect to RX and GND for the MIDI connection.


(frizting)
The Code
This code uses the Adafruit graphics library GFX which presents a simple interface to your code to allow you to set or clear pixels on the display, draw lines and shapes, and output text. Full details are available in the Adafruit tutorial and the same functions can be used for a whole range of their display modules.
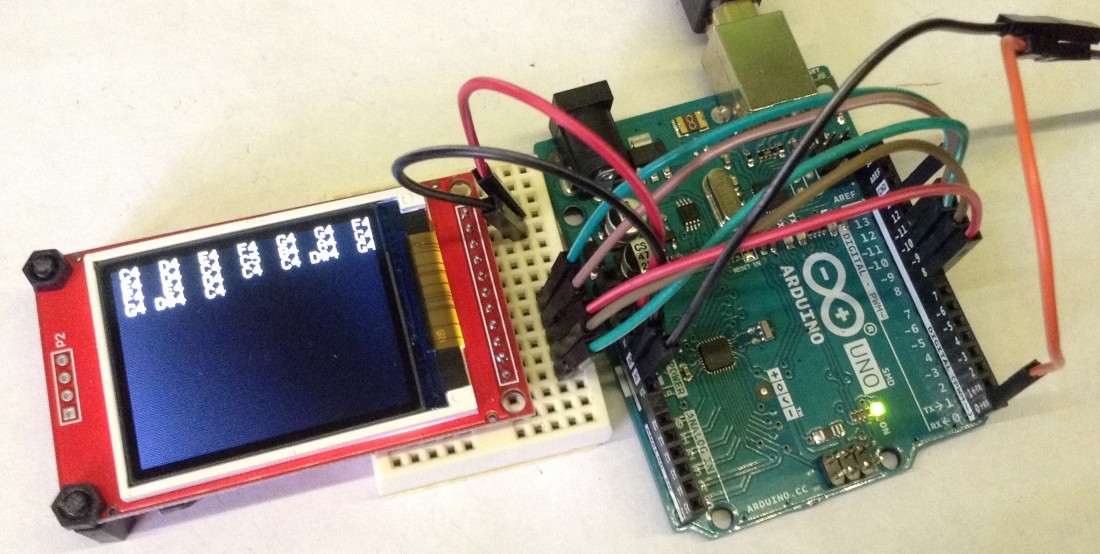
For this project, I’ve taken the ideas from my Simple MIDI Monitor and added in some functions to allow it to “print” to the display. The example code prints out which note it has received, using the notation “A1”, “F#3”, etc. It will keep printing notes across the screen whilst it is still receiving them and as soon as one line is full it starts printing on the next line. At the end of the screen it blanks the top half of the screen and starts again.
In order to translate between MIDI note numbers (in the range 21 to 127) and the “A1” style notation, I need to map over to note name (A to G, with sharps) and octaves.
Octave is fairly easy being note/12 less 1. So the lowest note, MIDI 21 (A0) is 12/21 = 1, less 1 i.e. so this is octave 0. Middle C is note 60, so 60/12 = 5, less 1 means middle C is “C4”.
To work out the note name though isn’t too difficult but it does require a list of the 12 note names to use, starting with “C” and including options for the sharps. Then the note name “index” in that list is simply note % 12 – i.e. using modulo arithmetic. So 21 % 12 is 9 (“A”) and 60 % 12 is 0 (“C”).
I used two lists, one for note names and one to include either a sharp or a space. However when printing I end up with text such as “C 4 C#4 D 4 D#4” and so on. In the end I settled on the following two lists:
char notes[12] = {' ','C',' ','D',' ',' ','F',' ','G',' ','A',' '};
char sharps[12] = {'C','#','D','#','E','F','#','G','#','A','#','B'};
Which means I construct the string to print out as follows:
Character from notes[] + Character from sharps[] + Octave number + space
Which gives a much more pleasing output (see the photos and video).
The other thing to think about is when to move to a new line and when to blank parts of the display. For this I keep track of the current row and column position, and every time a note is printed the column position is incremented by 4. When it gets off the side of the screen it is reset to zero and the row counter is incremented by 1. When that gets off the bottom of the screen, that is reset back to zero too.
Closing Thoughts
This is one of the simplest MIDI monitors possible with a full colour display – just printing out note names. There are many other options now available from channel activity to numerical “dumps” of MIDI data to actual note on and off activity and so on.
Also text is a very simple way to output these, but coloured text could take it further and it would be possible to start to include simple graphics too.
Kevin
