One thing missing from a MiniDexed build is USB device support. The Raspberry Pi will act as a USB host to USB devices, but the MiniDexed can’t be plugged into another USB host. Some versions of the Raspberry Pi (notably the zero and 3A+) support USB On The Go (OTG) which means they can act as a USB device.
But another approach, which can be used on any Pi, is to use a “co-processor” to route USB MIDI to serial MIDI. This project looks at an add-on IO board for the Pi using a XIAO SAMD21 to do just that.
Build Guide: XIAO Pi USB MIDI Device PCB – Part 2
Warning! I strongly recommend using old or second hand equipment for your experiments. I am not responsible for any damage to expensive instruments!
These are the key tutorials for the main concepts used in this project:
If you are new to microcontrollers, see the Getting Started pages.
The Circuit
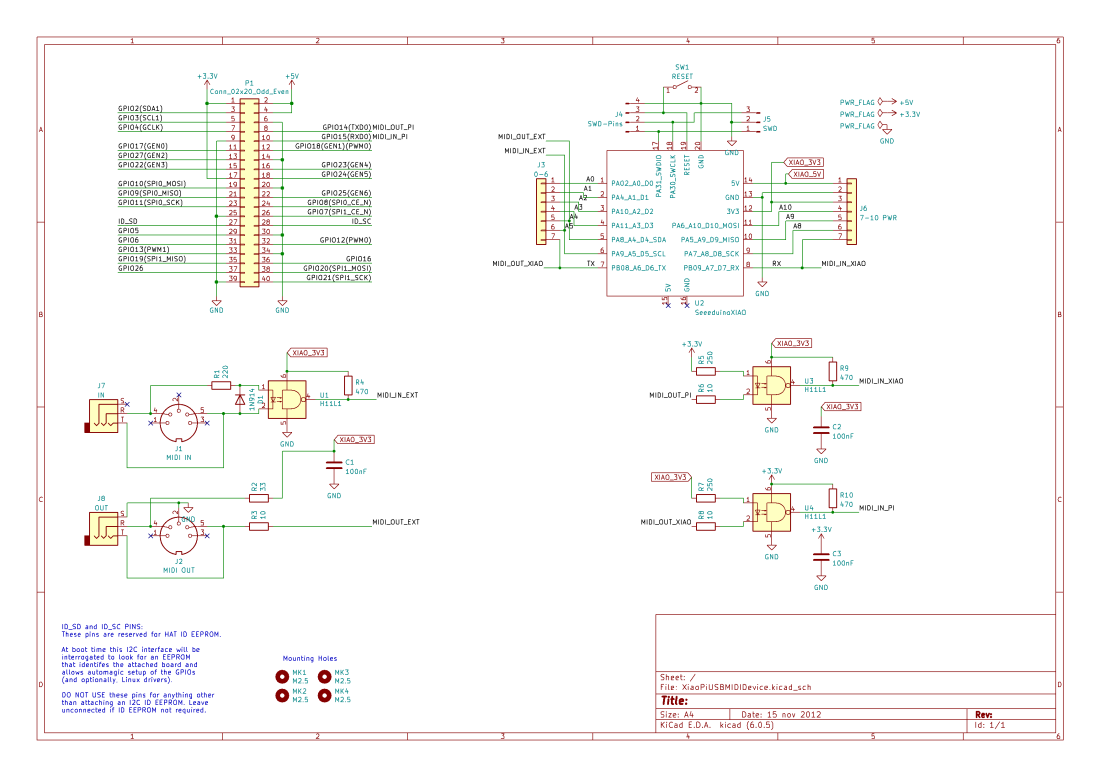
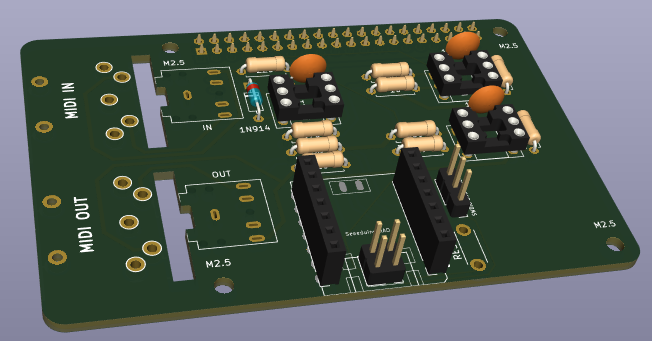
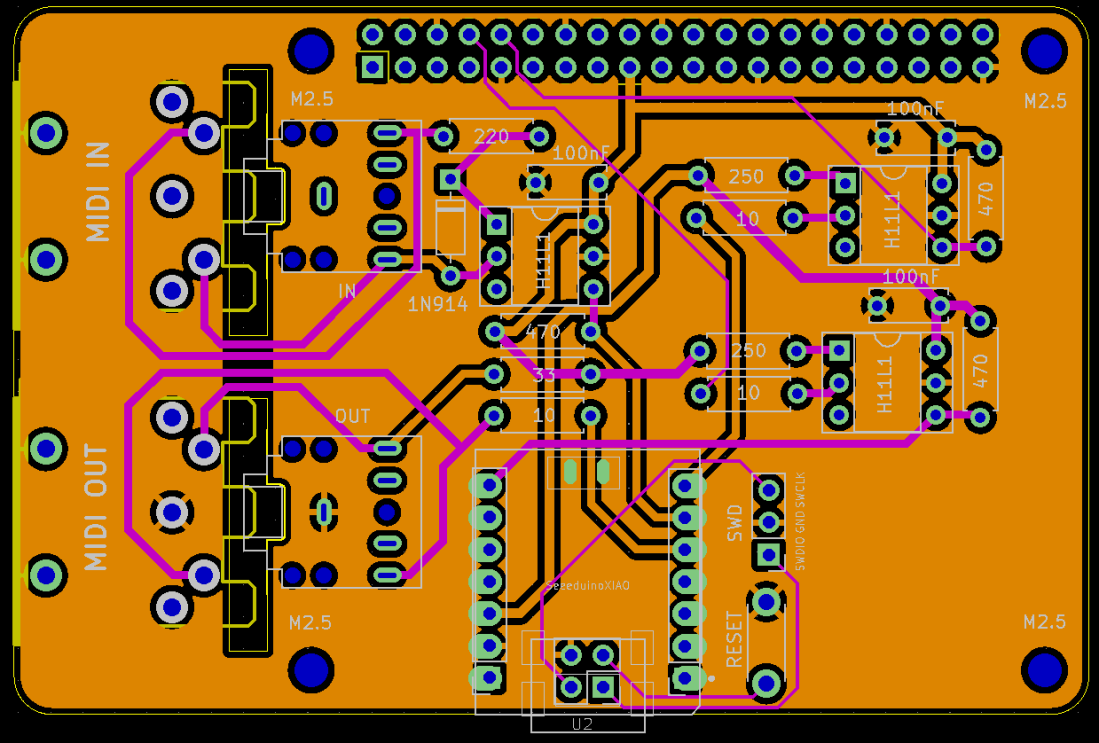
The MIDI side is my standard 3V3 MIDI circuit with a H11L1 optoisolator on the MIDI IN side and an unbuffered 3V3 compatible MIDI OUT stage.
The XIAO’s TX/RX will connect to the Pi’s RX/TX. But a key design feature was that I wanted to XIAO to be independently powered, after all it will be plugged into a MIDI USB host. To achieve that I’ve included a full two-way, opto-isolated MIDI interface between the XIAO and the Pi. This is in additional to the whole board’s external MIDI interface and means there are three optoisolators on the PCB. The Pi and XIAO also don’t share common 3V3 or 5V power.
There was a mistake in the first version of the schematic (and consequently the PCB design) in that the external MIDI circuits are connected to the Pi’s 3V3 supply, not the XIAO, so this separation wasn’t fully realised without a bit of patching. The build guide describes what can be done to fix this and the consequence of not fixing it (it still works, but the XIAO must be powered off while the Pi is booting up).
Note that I’ve condensed the three resistors for a complete 3V3 MIDI circuit (220Ω on the INPUT side and 33Ω and 10Ω on the OUTPUT side) into two: 250Ω on the source side and 10Ω for the sink. With hindsight, this wasn’t particularly sensible as 250 is an odd value for a resistor. Ultimately, MIDI specifies a 5mA current loop, hence the use of 220+33+10 = 263Ω in the circuit for 3V3 operation: (3.3 – 1.7) / 263 ~= 6-7mA (assuming a 1.7 voltage drop across the optoisolator) so a single 270Ω would make a lot more sense as it only has to provide enough current to activate the optoisolator.
Also, as the diode is there to protect the optoisolator from incorrectly wired midi cables that too can be omitted in this “hard-wired” 3V3 MIDI link.
The design means that the Pi must be powered independently. I thought it would be too much to attempt to power a “full” Pi from another USB host. It would almost certainly have been fine with a Pi Zero, but this is aiming for at least a Pi 3, and probably a Pi 4 to get the fully performant eight tone generators of MiniDexed working nicely.
There is also a reset switch and SWD set of headers. The latter are modelled of the XIAO expansion board.
The PCB only supports the XIAO SAMD21 as it uses one of the alternative serial ports as described in XIAO SAMD21, Arduino and MIDI – Part 2.
It might be possible to use alternative SAMD21 based XIAO style boards such as the Adafruit QT Py but I’ve not investigate the pinouts to see if the SERCOM devices can be reused as UARTS for the QT Py.
It also might be possible to use an alternative XIAO series board that supports reconfigurable IO to include an additional serial port. Another option might be the RP2040 version with a PIO serial port.
But I’m keeping things simple by using the XIAO SAMD21 and two hardware UARTs.
PCB Design
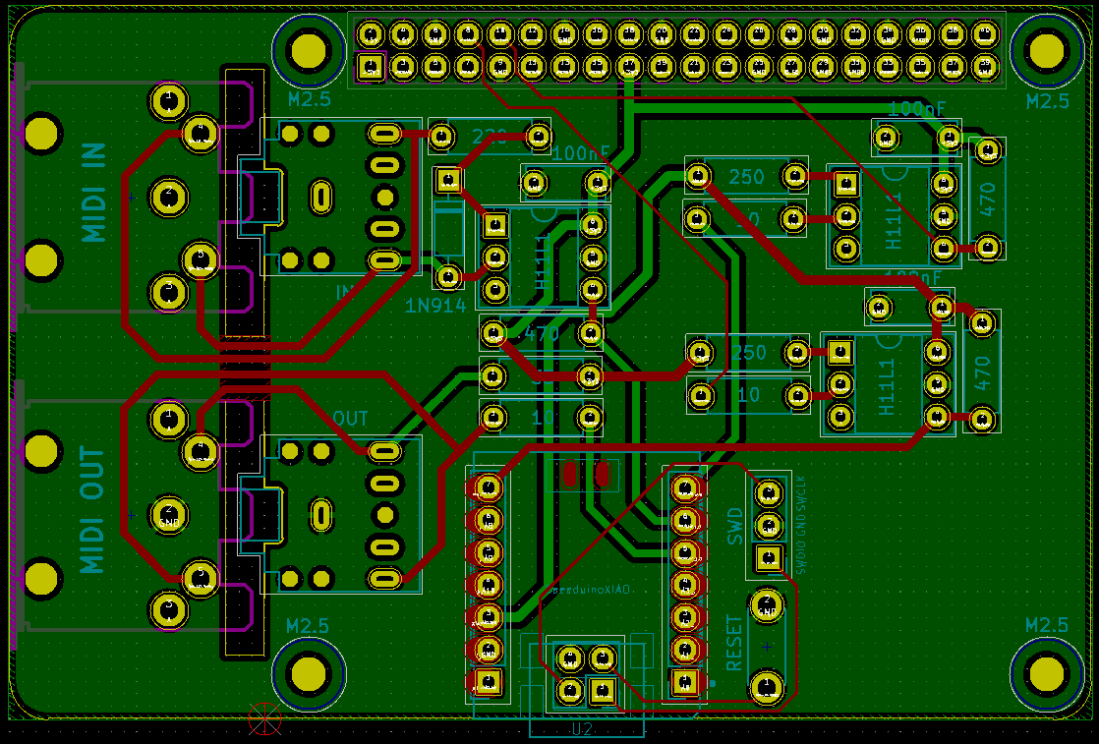
XIAO pins A6/A7 (TX/RX) connect to the internal MIDI interface which links to the Pi’s GPIO RX/TX pins. XIAO pins A4/A5 (SERCON 2 TX/RX) connect to the external MIDI interface.
There is a reset switch and SWD headers to make debugging easier. Note that the SWD and reset switch require a connection to the underside of the XIAO. One option is to use “pogo-pin” style headers, just like those used on the XIAO expansion board.
NOTE: The PCB should be pin-out compatible with the Adafruit QT Py series boards too, but only if the pogo-pins are left unpopulated as these boards don’t have pads (or don’t have them in the same place) on the underside of the board.
There are two options for MIDI connections. The board will support DIN MIDI connectors hanging off the underside of the board on the left hand side of the Pi (where the camera and SD card connectors are). But if MIDI TRS connectors are preferred (using “Type A” wiring), then the DIN section of the PCB can be cut off. Of course if serial MIDI is not required at all, relying just on USB MIDI, then the external MIDI circuitry can be left out as well.
The core principle is that this board can act as a stacked board between the Pi and a MiniDexed (or other) IO board so the use of an extended GPIO header will be assumed.
Important: The XIAO connects to the Pi using the Pi’s RX/TX pins, so any additional MIDI interface on a stacked board will have to be left out or disabled if used with the XIAO USB MIDI Device board. If serial MIDI is required, the XIAO board circuit should be used to provide it to enable the XIAO to correctly “MIDI merge” the inputs.
Closing Thoughts
This is a bit more of a risky prospect compared to my other XIAO PCBs, but the software concept is proven in the CircuitPython USB to Serial MIDI Router.
It may seem a little complex to have a full set of internal MIDI circuitry with opto-isolators when I’m interfacing RX/TX between two 3V3 systems, but I wanted to ensure I wouldn’t have a “parasitic power” issue like I had with my TX816. It looks like I almost achieved it!
These boards have been sent for manufacturing using the Seeed Fusion PCB service, which I am happy to continue to recommend. They have been supported with discount vouchers that I’ve been sent by Seeed for my previous projects.
Kevin
