My Arduino MIDI R2R Digital Audio has been used, pretty much unchanged, in my Lo-Fi Orchestra performances since my first recording, but I’ve always had a bit of an irritating “Lo-Fi click” when starting and stopping notes. But whilst I’ve tinkered a little, mostly I’ve just lived with it, but now I’m finally taking a look.
This project adds some very simple envelope generation to very slightly shape the start and ending of each note to remove the sharp edges and reduce the clicks.
Warning! I strongly recommend using an old or second hand keyboard for your MIDI experiments. I am not responsible for any damage to expensive instruments!
These are the key Arduino tutorials for the main concepts used in this project:
If you are new to Arduino, see the Getting Started pages.
Parts list
- Arduino Uno
- R2R Shield from Arduino R2R Digital Audio – Part 3
- MIDI receive module (see: Arduino MIDI Interfaces)
The Circuit
This is using my home-made resistor ladder shield from Arduino R2R Digital Audio – Part 3.
The Code
The issue I think I’m having is that the sound generation goes from nothing to instant sine wave in a single step change, which can induce all sorts of complex harmonics as the speaker producing the sounds go from stationary to moving in almost an instant.
The idea therefore is to introduce a sound envelope for the amplitude, so that the sine wave “creeps in” in volume terms, and then “fades out” when complete. Any synthesizer will include a range of options for “envelope generation” and a very common approach is the ADSR – attack, decay, sustain, release. But I’m going much simpler, with just an AR – attack and release – and with a fixed time for ramping up and fading out.
But it has required a bit of a refactoring of my previous code. There are now two functions that get called as part of the ddsOutput synthesis routine:
- getfrequency() – this updates the frequency if the note has changed but ensures that the frequency only changes at the start of the accumulator’s cycle, to prevent an abrupt change part way through.
- getenvelope() – this obtains an amplitude value that is multiplied with the current sample to be played to give a volume level. This recognises a “gate” signal from the NoteOn and NoteOff routines and can handle changing the amplitude when starting and stopping a note.
As already mentioned, I’ve introduced the idea of a “gate” signal which is true when a note is supposed to be playing and false when it isn’t. The envelope routine recognises the transitions false -> true and true -> false and shapes the envelope accordingly.
There are a couple of other changes that I’ve introduced to make the whole code a lot easier to follow:
- I’ve changed the “live” wavetable to run from -128 t +127 rather than 0 to 255 and introduced the idea of the “zero point bias” – recognising that when actually producing sound “zero” is actually the value 128 in a 0 to 255 range.
- I’ve had to introduce some 16-bit arithmetic to allow me to take the current 8-bit sample, multiply it by an 8-bit amplitude and then scale the result back to an 8-bit value.
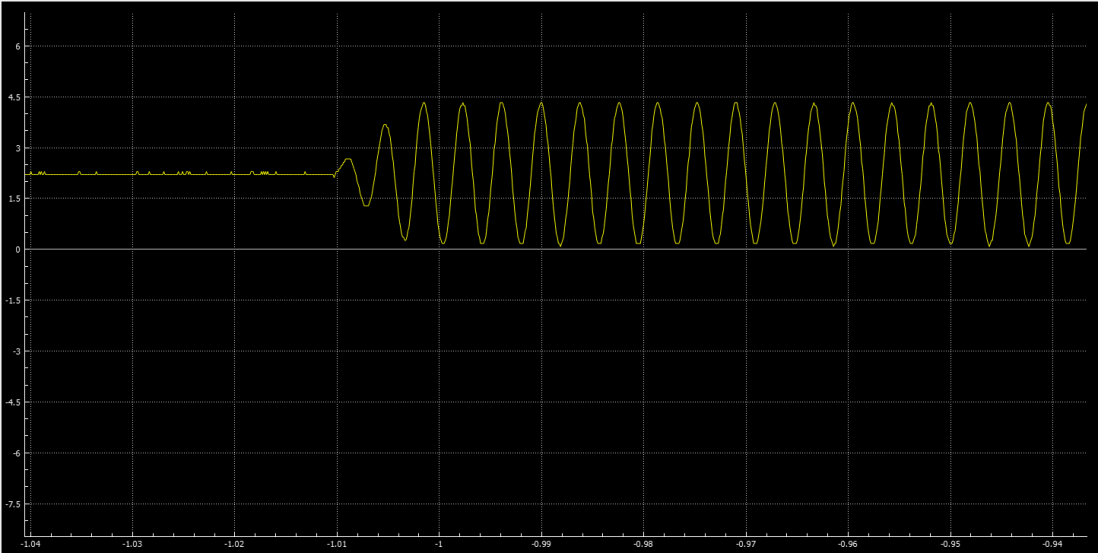
- I’ve introduced a “DDSDBG” mode that runs the ddsOutput() routine from the main loop() rather than from a timer. This runs a lot slower, so is useless for audio output, but it allows me to dump a range of parameters to the serial port on each scan. When shown in the serial plotter this allows me to see what is happening to the waveform, envelope, and other relevant parameters whilst the code is running.
Closing Thoughts
This is so much better now. The application of the envelope could be a bit more complicated to give even more of a useful result, but then I’m probably not far off just using Mozzi at that point and be done with it!
There are still some pops and clicks, but you can hear the different in my latest The Lo-Fi Orchestral Tubular Bells. All in all, this particular upgrade was long overdue!
Kevin
