I’ve not done anything with the Arduino’s built in tone() for a while so thought I’d revisit something I’ve wanted to explore for a while – Arduino tone() polyphony!
But not of the sort I explored in the Arduino Multi MIDI Tone Module which stacked up several Arduino MIDI Tone Modules together. Instead, I wanted to see how far a single Arduino could go. For an Arduino Uno, that is three-note polyphony. This is the result – a single Arduino MIDI Multi-tone Module.
Warning! I strongly recommend using old or second hand equipment for your experiments. I am not responsible for any damage to expensive instruments!
These are the key Arduino tutorials for the main concepts used in this project:
If you are new to Arduino, see the Getting Started pages.
Parts list
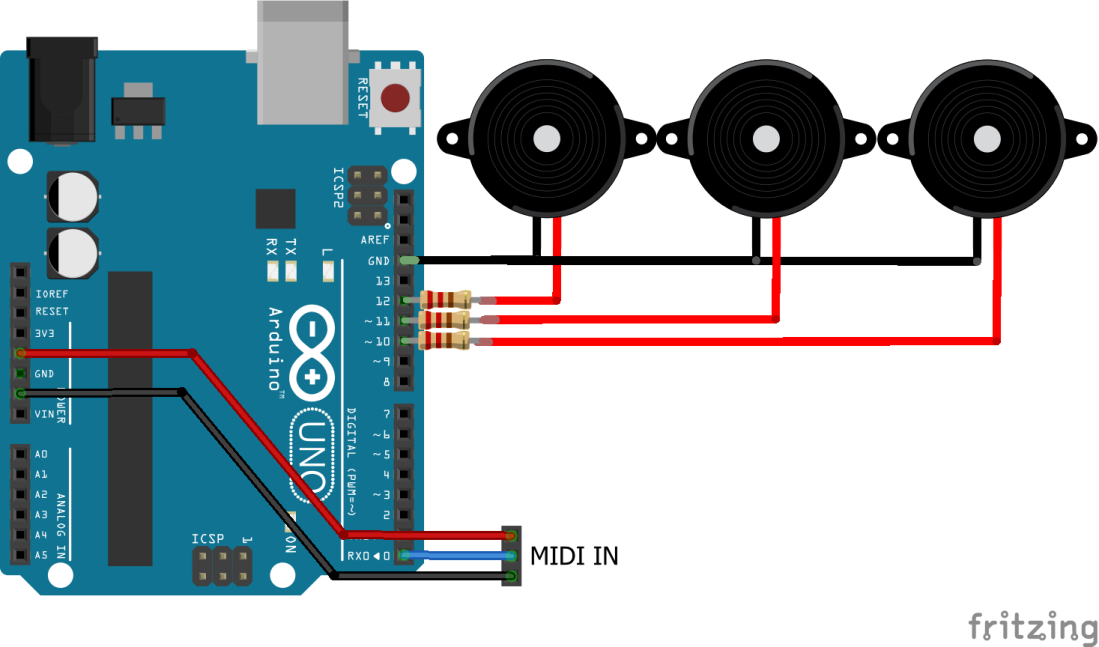
- Arduino Uno
- 3x 8 ohm speaker or old headphone speaker
- 3x 220Ω resistors
- One of the Arduino MIDI Interfaces
- Breadboard and jumper wires
The Circuit
This circuit effectively creates three Arduino MIDI Tone Modules form one Arduino. This works (with the right code) as the tones are created using one of the Arduino’s timers to create a square wave on an output pin by turning the pin on and off at a defined frequency. If you can create a square wave on several pins at the same time then you can create simple tone() polyphony.
The problem is that this method does not allow more than one frequency on any one pin at any one time. So if you want multiple tones to play you need multiple timers to drive them. This is what the updated Tone library from Brett Hagman does. It supports as many tones as the board you are using has timers.
For an Arduino Uno or Nano, using an ATmega328 there are three hardware timers. This means they can support three-note polyphony, although there is a caveat – the timers can’t really be used for anything else. Timer 0 in the Arduino Uno/Nano is used for the delay() and millis() functions, so if it is repurposed to play tones, those functions are no longer available.
If you have a board based on the ATmega1280 or 2560, then you have six timers available.
This project keeps things simple to demonstrate the principles, and shows the use of three separate speakers, each linked to one of the output pins using a 220Ω resistor. But it is possible to combine the outputs using a simple passive resistor mixer and use a single speaker. I’ll come back to that at some point, but for now this shows the idea.

The Code
The code is based on the Arduino MIDI Tone Module but uses the newer Tone library. You can install it in the usual way, but if you look for tone in the Arduino library manager you get quite a lot of entries. This is using “Tone by Brett Hagman – A software digital square wave tone generation library”.
There are configuration options at the top to set the number of note polyphony required, which IO pins to attach speakers to and what to do when you try to play more notes than there are available tones.
// Set up the output pins to be used for the speaker
#define POLYPHONY 3
int speakers[POLYPHONY] = {10,11,12};

Tone player[POLYPHONY];
byte playing[POLYPHONY];
int playidx;

// Set the mode for the polyphony:
// Comment out: Play first available notes, then no more.
// Uncomment: Replace notes in the sequence they were played.
//
//#define POLYOVERWRITE 1
The code has to keep track of which notes are playing so that noteOff messages are handled properly and so that it can decide how to handle receiving more notes than are available to play.
The tone library sets up an instance of the Tone library for each output pin, which has to be initialised and then can be played or stopped using functions.
In the setup() function:
  // Initialise the tones
  for (int i=0; i<POLYPHONY; i++) {
    player[i].begin(speakers[i]);
  }

In the MIDI handler functions:
  player[i].play(notes[pitch-MIDI_NOTE_START]);
Or
  player[i].stop();
The notes[] list contains all the frequencies to use for each MIDI note. The first MIDI note handled is given by MIDI_NOTE_START – the same as before.
Closing Thoughts
I have some smaller, third-party Arduino Mega compatible boards with an ATmega2560 on them, so I’d like to try those to see if I could easily get six-note polyphony too.
I also need to check how to wire-up a single speaker using a simple passive mixer that can take up to six outputs without overloading either the speaker or the Arduino.
It might also be fun to include some simple modulation by combining the tones somehow, but I suspect the effort required probably isn’t worth it compared to just going ahead with “proper” synthesis.
It would be nice to upgrade the Lo-Fi Orchestra to support four of these boards – if each has up to three note polyphony, I could create a 12-note “Arduino Multi MIDI Multi-Tone Module”… perhaps even more if I get the 2560 involved…
Kevin
